
Spacing For ColorBar on Standing Seam Metal Roofs
ColorBar Snow Rail Spacing Guidelines for Standing Seam Metal Roofs
Snow and ice can slide without warning on standing-seam metal roofs. This avalanche usually occurs the next day, when the sun comes out, and the snowpack begins to melt. Sudden avalanches on metal roofs can put gutters, walkways, vehicles, landscaping, and, most importantly, people at risk. A well‑designed ColorBar snow rail system securely holds snow and ice in place on the roof until they can safely melt. It also spreads the weight evenly across the roof, helping prevent dangerous slides before they happen.
The ColorBar system uses a structural 6061-T6 extruded aluminum bar that is strong enough to span panel seams up to 42 inches wide when designed correctly. Optional 2" color strips and powder-coated finishes allow the rails to blend with your roof color while still providing heavy-duty snow retention.
Important: Uniform spacing from eave to ridge is essential. On longer runs, a single row of rails placed only at the gutter edge is often not enough protection. Never isolate ColorBar on partial roof areas such as just over doors, walkways, or vent pipes. All upper roof areas must have snow retention installed before placing ColorBar on the lower sections.
These guidelines apply to roofs with a ground snow load of up to 45 PSF. For higher snow loads or complex roof designs, please submit a project to our Quote Request Form for a custom ColorBar layout.
Snow Rail Calculator – SnoBar & ColorBar (Standing Seam)
Disclaimer:
Calculator outputs are intended for preliminary reference only and do not constitute engineering advice or guaranteed system performance. Final snow retention system selection, layout, and spacing must be reviewed and confirmed with the roof system manufacturer prior to quoting or installation. IceBlox, Inc. shall not be held liable for any erroneous calculations, misinterpretations, or outcomes resulting from misuse of the calculator, reliance on its output, or the entry of incorrect, incomplete, or assumed data.
- This spacing recommendation is for SnoBar® and ColorBar when the ground snow load does not exceed 45 pounds per square foot (psf). If your snow load is higher, please fill out the Snow Rail Quote Request Form .
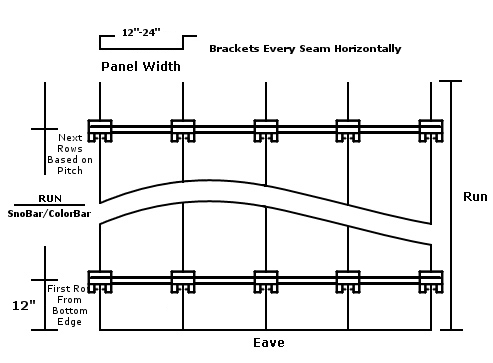
- Install the first row of SnoBar® or ColorBar approximately 12 inches above the roof drip edge. If the roof has an unsupported overhang, place the first row directly above the exterior structural wall.
- Space multiple recommended rows equally up the roof run to divide it into equal sections.
- The last bar in each row should span at least two seams and terminate no more than 3 inches past the final seam.
Please Pick Your Roof Pitch Below
Use the quick charts below to review the recommended ColorBar snow rail spacing for common standing-seam roof pitches. Then confirm your layout with the calculator above and your roof manufacturer or engineer.
1/12 – 2/12 Roof Pitch | 3/12 – 6/12 Roof Pitch | 7/12 – 12/12 Roof Pitch
1/12 to 2/12 Roof Pitch
Panel Valleys: 12–24 inches
IceStoppers: 12–17 inch panels use 1 IceStopper per panel; 18–24 inch panels use 2 IceStoppers per panel
Roof Pitch: 1/12 to 2/12
Recommended Spacing: Every 40 ft up the roof
Isolated Roof Areas: Never use ColorBar only over doorways or small isolated areas
Ground Snow Load: Up to 45 PSF
Begin about 1 foot up from the roof's bottom edge—or directly above the exterior wall if there's an overhang without support. From that point, install a continuous row of ColorBar snow rails, fastening one clamp to each seam across the full width of the roof. Add rows every 40 ft along the roof run, ensuring no vertical spacing between rows exceeds 40 ft. For example, an 80-ft panel run typically requires rails placed around 1 ft and 40 ft from the eave.
When possible, divide the roof into equal vertical sections with evenly spaced rows, while staying within the manufacturer's maximum spacing guidelines. All upper roof areas should have a snow retention system in place before installing ColorBar on a lower roof section. Never isolate short runs of ColorBar only over doors, walkways, or vent pipes.
3/12 to 6/12 Roof Pitch
Panel Valleys: 12–24 inches
IceStoppers: 12–17 inch panels use 1 IceStopper per panel; 18–24 inch panels use 2 IceStoppers per panel
Roof Pitch: 3/12 to 6/12
Recommended Spacing: Every 15 ft up the roof
Isolated Roof Areas: Never use ColorBar in isolated roof areas, such as just over doorways.
Ground Snow Load: Up to 45 PSF
Begin the first row of ColorBar approximately 1 ft above the eave, or over the exterior wall when there is an overhang. Add additional rows every 15 ft up the roof run. For example, a 30-ft panel run typically requires rails located around 1 ft and 15 ft from the eave. Do not exceed 15 ft vertically between ColorBar rows.
Divide the roof into equal sections whenever possible to evenly distribute the snow load. Confirm that all upper roof areas have snow retention installed before placing ColorBar on any lower roof section. Avoid isolating short segments of ColorBar above doors, loading docks, or vent pipes.
7/12 to 12/12 Roof Pitch
Panel Valleys: 12–24 inches
IceStoppers: 12–17 inch panels use 1 IceStopper per panel; 18–24 inch panels use 2 IceStoppers per panel
Roof Pitch: 7/12 to 12/12
Recommended Spacing: Every 10 ft up the roof
Isolated Roof Areas:Never install ColorBar in isolated roof areas.
Ground Snow Load: Up to 45 PSF
On steeper-sloped standing-seam metal roofs, start your first row of ColorBar roughly 1 ft above the eave, or if there is an unsupported overhang, place the ColorBar directly above the structural wall. Add additional rows every 10 ft up the slope. For example, a 20-ft panel run usually requires rails at about 1 ft and 10 ft from the eave. Do not exceed 10 ft vertically between rows.
As with lower pitches, divide the roof into equal vertical sections when possible. Equally splitting the roof sections helps keep the snow and ice load evenly distributed and reduces stress on any single row of ColorBar or roof panel. Protect all upper roof sections with a snow retention system before installing ColorBar on lower roofs. Avoid placing short, isolated runs over doors or small roof areas.
Disclaimer – ColorBar Spacing Guidelines
Use this web page only to develop plans, specifications, and/or approval drawings for construction projects that utilize products and components manufactured or distributed by IceBlox, Inc. (SnoBlox‑Snojax). It is intended solely as a quick reference for estimating ColorBar snow rail quantities and placement on roofs with a ground snow load of less than 45 PSF.
These guidelines do not account for snow shadows, drifting, sliding from upper roofs, or unusual weather conditions. The user is responsible for determining the suitability of the product for its intended use and assumes all risks of its use or handling. IceBlox, Inc. is not responsible for any estimates, takeoffs, or installations resulting from misuse or misinterpretation of this page or third-party tools.
Spacing For ColorBar Frequently Asked Questions (FAQs)
The ColorBar system comes in standard 6' and 12' lengths. Aluminum splice plates are provided with your system to connect multiple bars into a continuous run while allowing for expansion and contraction. Each splice connector feeds into the top channel of the bar. One side of the splice connector fastens to the first bar with a single tek screw, and the other end is allowed to float freely.
You can solve this problem quickly with the use of our IceStopper attachments. The IceStoppers are aluminum feet mechanically fastened to the back of the bar and hang perpendicular to the panel slope. These units rest against the panel and create additional protection and stopping power for the system. IceStoppers are optional, but we highly recommend them above pedestrian walkways and vehicle parking spaces. On panels with less than 18" seam spacing, only a single IceStopper, centered in the panel flat, is needed. Panels from 18"-24" require 2 IceStoppers per panel spaced evenly. Panels with seam spacing greater than 24" require 3 IceStoppers spaced evenly.
The superior holding strength and deflection properties of the ColorBar make it highly effective on standing seam panels up to 42" widths. We do not recommend the galvanized SnoBar system on panels with seam spacing greater than 24."
The ColorBar is available in mill finish and can be custom color-matched with a powder-coated finish. Suppose you are looking for a more economical solution. In that case, you can utilize the channel on the front face of the bar, which accepts a 2" wide color strip. We offer a small selection of colors that are available by phone. You can also provide your own using leftover flat stock metal from your roof installation or by calling your local roofing supplier. Our customers sometimes paint their systems upon arrival as a final option.
The SnoBar system consists of a hollow, 1" x 1" square tube constructed of Gator Shield-coated galvanized steel. The ColorBar system uses an extruded 6061-T6 aluminum bar. Both systems can be ordered online in mill finish or by phone for a custom powder-coated finish. Due to its superior strength, the ColorBar can span panels wider than 24". An additional benefit to the ColorBar system is its ability to accept a 2" wide Color Strip in its front face as a more economical alternative to powder coating.
Standing Seam Structural Aluminum ColorBar Snow Rails


SNOBAR COLORBAR PRICING
Price List for 12 foot SnoBar and ColorBar