
Spacing For SnoBar on Standing Seam Metal Roofs
Complete SnoBar® Snow Rail Spacing Requirements for Standing Seam Roofs
Snow and ice can slide quickly on slick-coated metal roofs, creating dangerous avalanche conditions. These spacing practices are used across U.S. and Canadian snow-belt regions where sliding snow is common. A properly designed SnoBar® snow retention system spreads the load across the full roof area. It helps prevent sudden sheet-style slides that can damage walkways, gutters, vehicles, and landscaping.
Uniform spacing from eave to ridge is essential. On longer panel runs, a single row of SnoBar® at the gutter is often insufficient. Never isolate SnoBar® on partial roof areas such as over doors or vents.
Use our Standing Seam Snow Rail Calculator to generate precise SnoBar® row spacing for your roof.
These spacing guidelines apply to roofs up to 45 PSF ground snow load. It is always advisable to have final SnoBar® and ColorBar layouts reviewed by the manufacturer or an engineer. For heavier snow loads, request a layout via our Quote Request Form.
All upper roof areas must have a snow retention system installed before using SnoBar® on lower sections.
Before determining SnoBar® spacing, have the following details ready:
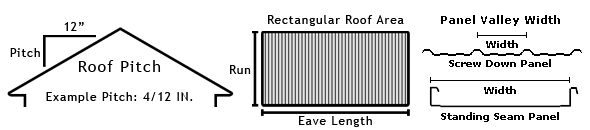
• Roof pitch
• Panel run length
• Panel valley width
• Ground snow load
SnoBar® spacing is determined by roof pitch, panel length, panel width, and required load distribution.
Snow Rail Calculator – SnoBar & ColorBar (Standing Seam)
Disclaimer:
Calculator outputs are intended for preliminary reference only and do not constitute engineering advice or guaranteed system performance. Final snow retention system selection, layout, and spacing must be reviewed and confirmed with the roof system manufacturer prior to quoting or installation. IceBlox, Inc. shall not be held liable for any erroneous calculations, misinterpretations, or outcomes resulting from misuse of the calculator, reliance on its output, or the entry of incorrect, incomplete, or assumed data.
- This spacing recommendation is for SnoBar® and ColorBar when the ground snow load does not exceed 45 pounds per square foot (psf). If your snow load is higher, please fill out the Snow Rail Quote Request Form .
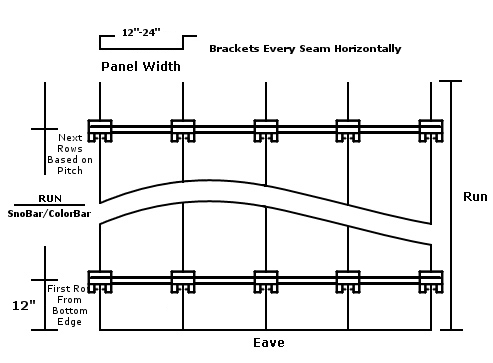
- Install the first row of SnoBar® or ColorBar approximately 12 inches above the roof drip edge. If the roof has an unsupported overhang, place the first row directly above the exterior structural wall.
- Space multiple recommended rows equally up the roof run to divide it into equal sections.
- The last bar in each row should span at least two seams and terminate no more than 3 inches past the final seam.
Select Your Roof Pitch
| 1/12 Pitch | 2/12–3/12 Pitch | 4/12–6/12 Pitch | 7/12–9/12 Pitch | 10/12–12/12 Pitch |
1/12 Roof Pitch
 Panel Valleys: 12–24 in
Snow Load: Up to 45 PSF
Spacing: Every 50 ft vertically
IceStoppers: 12–17 inch panel = 1 per panel; 18–24 in = 2 per panel
Do Not: Isolate SnoBar® in isolated roof areas
Install the first row approx. 1 ft from the eave. Add additional rows every 50 ft. A 100-ft panel requires rows at approx. 1 ft and 50 ft. Keep spacing even to distribute the snow load and never exceed the manufacturer's maximum distance between rows.
2/12 – 3/12 Roof Pitch
Panel Valleys: 12–24 in
Snow Load: Up to 45 PSF
Spacing: Every 18 ft vertically
IceStoppers: 12–17 inch panel = 1 per panel; 18–24 in = 2 per panel
Do Not: Isolate SnoBar® in isolated roof areas
Start approx. 1 ft from the eave. Add rows every 18 ft. A 36-ft panel typically requires rows at approx. 1 ft and 18 ft. Keep spacing even to distribute the snow load and never exceed the manufacturer's maximum distance between rows.
4/12 – 6/12 Roof Pitch
Panel Valleys: 12–24 in
Snow Load: Up to 45 PSF
Spacing: Every 10 ft vertically
IceStoppers: 12–17 inch panel = 1 per panel; 18–24 in = 2 per panel
Do Not: Isolate SnoBar® in isolated roof areas
Begin the first row approx. 1 ft from the eave. Add rows every 10 ft. A 20-ft panel usually requires rows at approx. 1 ft and 10 ft. Keep spacing even to distribute the snow load and never exceed the manufacturer's maximum distance between rows.
7/12 – 9/12 Roof Pitch
Panel Valleys: 12–24 in
Snow Load: Up to 45 PSF
Spacing: Every 7.5 ft vertically
IceStoppers: 12–17 inch panel = 1 per panel; 18–24 in = 2 per panel
Do Not: Isolate SnoBar® in isolated roof areas
First row begins approx. 1 ft from the eave. Add additional rows every 7.5 ft. A 15-ft roof requires rows near 1 ft and 7.5 ft. Keep spacing even to distribute the snow load and never exceed the manufacturer's maximum distance between rows.
10/12 – 12/12 Roof Pitch
Panel Valleys: 12–24 in
Snow Load: Up to 45 PSF
Spacing: Every 6 ft vertically
IceStoppers: 12–17 inch panel = 1 per panel; 18–24 in = 2 per panel
Do Not: Isolate SnoBar® in isolated roof areas
Begin the first row approx. 1 ft from the eave. Add rows every 6 ft. A 12-ft roof requires rows at approx. 1 ft and 6 ft. Keep spacing even to distribute the snow load and never exceed the manufacturer's maximum distance between rows.
Disclaimer
These guidelines are intended only for developing SnoBar® layouts on roofs with less than 45 PSF ground snow load. They apply only to IceBlox, Inc. manufactured and distributed products.
IceBlox, Inc. is not responsible for any material takeoffs, estimates, or installations resulting from misuse of this guide. The user must determine the suitability of the product for its intended application and assumes all associated risks.
Spacing For SnoBar Frequently Asked Questions (FAQs)
A 1" x 1" square hollow tube of Gator Shield-coated galvanized steel makes up the SnoBar system. The extruded 6061-T6 aluminum bar used in the ColorBar system can accommodate a color strip. Both systems are available for online purchase, in mill finish, or by phone in powder-coated finish. The superior strength of the ColorBar allows it to span panels wider than 24".
Standing seam rail systems have an optional attachment called IceStoppers. These essential accessories prevent low-lying snow and ice from sliding underneath the rails. They secure to the back of the bar without panel penetration. Although they are optional, we strongly recommend IceStoppers over locations where pedestrians or vehicles are present. Previously installed rail systems can have IceStoppers retrofitted.
SnoBar and ColorBar devices are compatible with almost any style of sloped roofing. We offer snow rail systems for a variety of roofing types, including Standing Seam, Screw Down, PBR, Wavy Corrugated, Shingle, Membrane, TPO, and Slate.
You may order mill finish, 6-foot SnoBar, and ColorBar kits on our website. We also have 12-foot bars shipped LTL in wooden crates when higher linear footage volumes are necessary or when a bespoke powder-coated finish is wanted. Our technicians are ready to provide our customers with a price for these systems. Turnaround periods for price quotes are typically 24 to 48 hours.
A correctly designed snow rail system typically includes multiple rows up the roof slope to distribute weight evenly. Variations in panel types, seam spacing, roof slopes, snow loads, and attachment methods significantly impact the layout of a project. Please refer to our spacing charts or fill out the SnoBar or ColorBar Quote Request Forms for more details.
The SnoBar system features black plastic endcaps that seal the ends of the bars. The caps are made from low-density polyethylene and have a service temperature of 150° F (66° C). These end caps provide the bar with a clean, finished look while preventing outside elements, insects, and rodents from getting inside. Two caps are required per bar and help hide bare cut edges on painted or powder-coated systems when field cuts are necessary.
The SnoBar system includes a 10-page set of detailed instructions, expertly designed to guide you every step of the way.
SnoBar Snow Rails for Standing Seam Metal Roofing


SNOBAR COLORBAR PRICING
Price List for 12 foot SnoBar and ColorBar