Spacing For 2.67 Corrugated Screw Down Snow Rail Snow Guards on Exposed Fastener Metal Roofs
2.67 Corrugated SnoBar and ColorBar Spacing Guidelines
In parts of the world that receive winter precipitation, snow and ice on glossy coated metal roofing can create an extremely dangerous avalanche condition. A properly installed snow guard system can mitigate this condition. Our approach to proper placement involves an overall spacing throughout the entire roof area to keep snow and ice from shifting initially. Once frozen precipitation loses its grip on a metal roof and begins a downhill slide, everything in its path will be destroyed. A single row of guards placed along the eave or gutter edge of the roof is not always enough protection against this dangerous condition. An evenly distributed snow load will preserve the long-term integrity of the actual structure, metal roof and snow retention system. Isolating snow guards on partial roof sections such as just over doorways or roof vents is not recommended. Select your pitch below to get a general spacing guideline. All upper roof areas must have a snow retention installed before installing snow guards on a lower roof. This page should only be used only as a quick reference guide for estimating snow guard quantities and placement on roofs with up to 45 PSF ground snow load. Always consult with an architect or engineer for recommended snow guard placement for your project. This spacing guideline does not account for snow shadows, drifting or unseasonable conditions. If your ground snow load exceeds 45PSF please fill out our Quote Request Form for the heavy duty SnoBar/ColorBar systems.
Please Click on Your Roof Pitch Below
| 1/12 Roof Pitch | 2/12 - 3/12 Pitch | 4/12 - 6/12 Pitch | 6/12 - 7/12 Pitch | 8/12 - 10/12 Pitch | 11/12 - 12/12 Pitch |
1/12 Roof Pitch
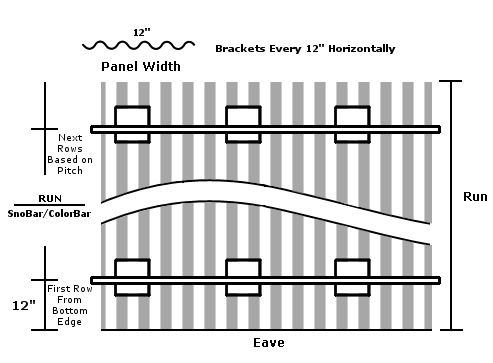
Bracket Spacing: Mounting bracket every 12 inches
Pitch: 1/12
Spacing: Snow rails are installed every 25 feet going up the roof.
Isolated Roof Areas: Never use SnoBar/ColorBar in isolated roof areas such as just over doorways etc.
Snow load: Up to 45 PSF ground snow load.
If your metal roof panels are mounted on top of purlins or firing strips, the snow rails must be screwed into the purlin or firing strip underneath. If your metal panels are placed on decking, we would recommend screwing into all the mounting holes on the mounting bracket after confirming that your decking is adequate to secure the snow retention system. Place your first bar over the Eave Strut or over the end wall on a supported overhang and run bars across the entire roof. Move up the roof every 25 feet and repeat with a bar that runs across the entire roof. Do not exceed 25 feet vertically between rows of bars. When possible, always attempt to divide the roof areas into equal sections, with equal distances between bars. Please ensure that your purlins and/or decking material are in good serviceable condition and can withstand the snow loads that will be transferred to it by installing a snow retention system. All upper roof areas must have snow retention installed before installing snow guards on a lower roof. Never isolate areas of snow guards such as just over doorways or vent pipes.
2/12 - 3/12 Roof Pitch
Bracket Spacing: Mounting bracket every 12 inches
Pitch: 2/12 to 3/12
Spacing: Snow rails are installed every 15 feet going up the roof.
Isolated Roof Areas: Never use SnoBar/ColorBar in isolated roof areas such as just over doorways etc.
Snow load: Up to 45 PSF ground snow load.
If your metal roof panels are mounted on top of purlins or firing strips, the snow rails must be screwed into the purlin or firing strip underneath. If your metal panels are placed on decking, we would recommend screwing into all the mounting holes on the mounting bracket after confirming that your decking is adequate to secure the snow retention system. Place your first bar over the Eave Strut or over the end wall on a supported overhang and run bars across the entire roof. Move up the roof every 15 feet and repeat with a bar that runs across the entire roof. Do not exceed 15 feet vertically between rows of bars. When possible, always attempt to divide the roof areas into equal sections, with equal distances between bars. Please ensure that your purlins and/or decking material are in good serviceable condition and can withstand the snow loads that will be transferred to it by installing a snow retention system. All upper roof areas must have snow retention installed before installing snow guards on a lower roof. Never isolate areas of snow guards such as just over doorways or vent pipes.
4/12 - 5/12 Roof Pitch
Bracket Spacing: Mounting bracket every 12 inches
Pitch: 4/12 to 6/12
Spacing: Snow rails are installed every 10 feet going up the roof.
Isolated Roof Areas: Never use SnoBar/ColorBar in isolated roof areas such as just over doorways etc.
Snow load: Up to 45 PSF ground snow load.
If your metal roof panels are mounted on top of purlins or firing strips, the snow rails must be screwed into the purlin or firing strip underneath. If your metal panels are placed on decking, we would recommend screwing into all the mounting holes on the mounting bracket after confirming that your decking is adequate to secure the snow retention system. Place your first bar over the Eave Strut or over the end wall on a supported overhang and run bars across the entire roof. Move up the roof every 10 feet and repeat with a bar that runs across the entire roof. Do not exceed 10 feet vertically between rows of bar. When possible, always attempt to divide the roof areas into equal sections, with equal distance between bars. Please ensure that your purlins and/or decking material is in good serviceable condition and can withstand the snow loads that will be transferred to it by installing a snow retention system. All upper roof areas must have snow retention installed before installing snow guards on a lower roof. Never isolate areas of snow guards such as just over doorways or vent pipes.
6/12 - 7/12 Roof Pitch
Bracket Spacing: Mounting bracket every 12 inches
Pitch: 6/12 to 7/12
Spacing: Snow rails are installed every 7.5 feet going up the roof. .
Isolated Roof Areas: Never use SnoBar/ColorBar in isolated roof areas such as just over doorways etc.
Snow load: Up to 45 PSF ground snow load.
If your metal roof panels are mounted on top of purlins or firing strips, the snow rails must be screwed into the purlin or firing strip underneath. If your metal panels are placed on decking, we would recommend screwing into all the mounting holes on the mounting bracket after confirming that your decking is adequate to secure the snow retention system. Place your first bar over the Eave Strut or over the end wall on a supported overhang and run bars across the entire roof. Move up the roof every 7.5 feet and repeat with a bar that runs across the entire roof. Do not exceed 7.5 feet vertically between rows of bar. When possible, always attempt to divide the roof areas into equal sections, with equal distance between bars. Please ensure that your purlins and/or decking material is in good serviceable condition and can withstand the snow loads that will be transferred to it by installing a snow retention system. All upper roof areas must have snow retention installed before installing snow guards on a lower roof. Never isolate areas of snow guards such as just over doorways or vent pipes.
8/12 - 10/12 Roof Pitch
Bracket Spacing: Mounting bracket every 12 inches
Pitch: 8/12 to 10/12
Spacing: Snow rails are installed every 6 feet going up the roof.
Isolated Roof Areas: Never use SnoBar/ColorBar in isolated roof areas such as just over doorways etc.
Snow load: Up to 45 PSF ground snow load.
If your metal roof panels are mounted on top of purlins or firing strips, the snow rails must be screwed into the purlin or firing strip underneath. If your metal panels are placed on decking, we would recommend screwing into all the mounting holes on the mounting bracket after confirming that your decking is adequate to secure the snow retention system. Place your first bar over the Eave Strut or over the end wall on a supported overhang and run bars across the entire roof. Move up the roof every 6 feet and repeat with a bar that runs across the entire roof. Do not exceed 6 feet vertically between rows of bar. When possible, always attempt to divide the roof areas into equal sections, with equal distance between bars. Please ensure that your purlins and/or decking material is in good serviceable condition and can withstand the snow loads that will be transferred to it by installing a snow retention system. All upper roof areas must have snow retention installed before installing snow guards on a lower roof. Never isolate areas of snow guards such as just over doorways or vent pipes.
11/12 - 12/12 Roof Pitch
Bracket Spacing: Mounting bracket every 12 inches
Pitch: 11/12 to 12/12.
Spacing: Snow rails are installed every 5 feet going up the roof.
Isolated Roof Areas: Never use SnoBar/ColorBar in isolated roof areas such as just over doorways etc.
Snow load: Up to 45 PSF ground snow load.
If your metal roof panels are mounted on top of purlins or firing strips, the snow rails must be screwed into the purlin or firing strip underneath. If your metal panels are placed on decking, we would recommend screwing into all the mounting holes on the mounting bracket after confirming that your decking is adequate to secure the snow retention system. Place your first bar over the Eave Strut or over the end wall on a supported overhang and run bars across the entire roof. Move up the roof every 5 feet and repeat with a bar that runs across the entire roof. Do not exceed 5 feet vertically between rows of bar. When possible, always attempt to divide the roof areas into equal sections, with equal distance between bars. Please ensure that your purlins and/or decking material is in good serviceable condition and can withstand the snow loads that will be transferred to it by installing a snow retention system. All upper roof areas must have snow retention installed before installing snow guards on a lower roof. Never isolate areas of snow guards such as just over doorways or vent pipes.
Disclaimer
This page may be used only for the purpose of developing plans, specifications and/or approval drawings for construction projects utilizing only IceBlox, Inc. manufactured or distributed products and components. It is to be used only as a quick reference for estimating snow guard quantities and placement on roofs with less than 45 PSF ground snow load.
IceBlox Inc., d.b.a SnoBlox-Snojax, referred to hereafter as IceBlox, Inc., or any subsidiary brands or companies, is not responsible for estimates or purchases resulting from the erroneous or improper use of this page or snowguardspacingtool.com.
The user shall determine the suitability of the product for its intended use and assumes all risks of its use or handling. In regards to spacing guidelines, quotations and or layouts, Iceblox, Inc. will not be held liable for incorrect material quantities not recommended on snowguardspacingtool.com and/or SnoBlox-Snojax.com

SnoBar ColorBar Pricing
Price List for 12 foot SnoBar and ColorBar
2.67 Snow Rail Spacing Frequently Asked Questions (FAQs)
The 2.67 rail system does not require IceStoppers as the bar rests slightly above the high ridges of the wavy corrugated panel. The tight proximity to the top of the panel ridges minimizes the potential for snow and ice to travel under the bar. However, it does allow enough room for snowmelt and rain to drain into the gutters.
You should install the 2.67 rail system in straight rows that travel the entire length of the roof section you are protecting. Installations in isolated areas, such as over doorways or HVAC units, are never recommended. Aluminum splice connectors link the ColorBar railing lengths to create a continuous run. When using the SnoBar, plastic end caps seal both ends of each bar. A small gap should be left between the bars to allow for expansion and contraction. Multiple rows may be required going up the slope depending on roof pitch, panel dimensions, ground snow load, etc.
The SnoCleat PBR should be installed using one of our two suggested screws, depending on the construction material of your building. Use the 1.5" Master Drillers to attach to metal purlins or the 2" Master Grippers to attach to wood purlins or decking.
An adequately installed snow rail system shouldn't result in roof leaks. Use our foam gaskets in conjunction with screws that include neoprene washers. On rare occasions, our customers will use a bead of neutral curing, cold weather silicone to outline the colorbracket bases for additional protection. It is not necessary to complete this step.