Spacing For Screw Down SnoCleat PBR Snow Guards on Exposed Fastener Metal Roofs
Screw Down PBR SnoCleat Snow Guard Spacing Guidelines
In parts of the world that receive winter precipitation, snow and ice on glossy-coated metal roofing can create an extremely dangerous avalanche condition. A properly installed snow guard system can mitigate this condition. Our approach to proper placement involves an overall spacing throughout the entire roof area to keep snow and ice from shifting initially. Once frozen precipitation loses its grip on a metal roof and begins a downhill slide, everything in its path will be destroyed. A single row of guards placed along the eave or gutter edge of the roof is not always enough protection against this dangerous condition. An evenly distributed snow load will preserve the long-term integrity of the actual structure, metal roof, and snow retention system. Isolating snow guards on partial roof sections such as just over doorways or roof vents is not recommended. Select your pitch below to get a general spacing guideline. All upper roof areas must have snow retention installed before installing snow guards on a lower roof. This page should only be used only as a quick reference guide for estimating snow guard quantities and placement on roofs with up to 45 PSF ground snow load. Always consult with an architect or engineer for recommended snow guard placement for your project. This spacing guideline does not account for snow shadows, drifting, or unseasonable conditions. If your ground snow load exceeds 45PSF please fill out our Quote Request Form for the heavy-duty SnoBar/ColorBar systems.
Please Pick Your Roof Pitch Below
| 1/12 - 2/12 Pitch | 3/12 - 4/12 Pitch | 5/12 - 6/12 Pitch | 7/12 - 8/12 Pitch | 9/12 - 12/12 Pitch |
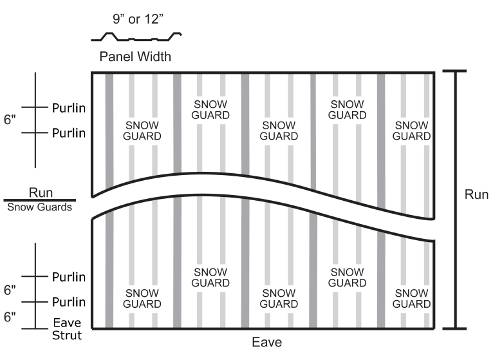
1/2 - 2/12 Roof Pitch

Eave Strut: Horizontal beams that are installed between the roof rafters or trusses and the top plate of the exterior wall.
Panel: Snow guards staggered in every panel flat
Pitch: 1/12 to 2/12 pitch.
Use: Staggered pattern of snow guards every 25 feet going up the roof.
Snow load: Up to 45 PSF ground snow load.
If your metal roof panels are only mounted on top of purlins or firing strips, the snow guards must be screwed into the purlins or firing strips. If your metal panels are placed on the decking, make sure your decking is adequate to secure the snow guards. Place your first staggered pattern of snow guards in, every other panel flat, along the Eave Strut (1 foot from the bottom edge on decking). Then move up to the first purlin above the eave strut (2 feet up from the bottom edge on decking) and place a snow guard in the center of each valley, alternating from the row below to create a staggered pattern that spans across the entire roof. Move up the roof every 25 feet and repeat the same staggered pattern of guards across the entire roof. Do not exceed 25 feet vertically between staggered patterns of snow guards. When possible, always attempt to divide the roof areas into equal sections, with equal distance between patterns of snow guards. Please note that our spacing is based on metal panels attached directly to a flat decking surface such as plywood or OSB. If your metal roof panels are attached to horizontal purlins (strips of wood that leave an air gap between the roof structure and the panels) then you will need to modify the staggering of the rows to ensure that your fasteners are getting into solid structural wood. Please ensure that your purlins and/or decking material are in good serviceable condition and can withstand the snow loads that will be transferred to it by installing a snow retention system. All upper roof areas must have snow retention installed before installing snow guards on a lower roof. Never isolate areas of snow guards such as just over doorways or vent pipes.
3/12 - 4/12 Roof Pitch
Eave Strut: Horizontal beams that are installed between the roof rafters or trusses and the top plate of the exterior wall.
Panel: Snow guards staggered in every panel flat
Pitch: 3/12 up to 4/12 pitch.
Use: Staggered pattern of snow guards every 20 feet going up the roof.
Snow load: Up to 45 PSF ground snow load.
If your metal roof panels are only mounted on top of purlins or firing strips, the snow guards must be screwed into the purlins or firing strips. If your metal panels are placed on the decking, make sure your decking is adequate to secure the snow guards. Place your first staggered pattern of snow guards in, every other panel flat, along the Eave Strut (1 foot from the bottom edge on decking). Then move up to the first purlin above the eave strut (2 feet up from the bottom edge on decking) and place a snow guard in the center of each valley, alternating from the row below to create a staggered pattern that spans across the entire roof. Move up the roof every 20 feet and repeat the same staggered pattern of guards across the entire roof. Do not exceed 20 feet vertically between staggered patterns of snow guards. When possible, always attempt to divide the roof areas into equal sections, with equal distance between patterns of snow guards. It is highly recommended to screw into a purlin or structural support. This spacing recommendation can be slightly adjusted to accommodate locations of the structural support and purlins under the metal roof sheets. All upper roof areas must have snow retention installed before installing snow guards on a lower roof. Never isolate areas of snow guards such as just over doorways or vent pipes.
5/12 - 6/12 Roof Pitch
Eave Strut: Horizontal beams that are installed between the roof rafters or trusses and the top plate of the exterior wall.
Panel: Snow guards staggered in every panel flat
Pitch: 5/12 up to 6/12 pitch.
Use: Staggered pattern of snow guards every 10 feet going up the roof.
Snow load: Up to 45 PSF ground snow load.
If your metal roof panels are only mounted on top of purlins or firing strips, the snow guards must be screwed into the purlins or firing strips. If your metal panels are placed on the decking, make sure your decking is adequate to secure the snow guards. Place your first staggered pattern of snow guards in, every other panel flat, along the Eave Strut (1 foot from the bottom edge on decking). Then move up to the first purlin above the eave strut (2 feet up from the bottom edge on decking) and place a snow guard in the center of each valley, alternating from the row below to create a staggered pattern that spans across the entire roof. Move up the roof every 10 feet and repeat the same staggered pattern of guards across the entire roof. Do not exceed 10 feet vertically between staggered patterns of snow guards. When possible, always attempt to divide the roof areas into equal sections, with equal distance between patterns of snow guards. It is highly recommended to screw into a purlin or structural support. This spacing recommendation can be slightly adjusted to accommodate locations of the structural support and purlins under the metal roof sheets. All upper roof areas must have snow retention installed before installing snow guards on a lower roof. Never isolate areas of snow guards such as just over doorways or vent pipes.
7/12 - 8/12 Roof Pitch
Eave Strut: Horizontal beams that are installed between the roof rafters or trusses and the top plate of the exterior wall.
Panel: Snow guards staggered in every panel flat
Pitch: 7/12 up to 8/12 pitch.
Use: Staggered pattern of snow guards every 5 feet going up the roof.
Snow load: Up to 45 PSF ground snow load.
If your metal roof panels are only mounted on top of purlins or firing strips, the snow guards must be screwed into the purlins or firing strips. If your metal panels are placed on decking, make sure your decking is adequate to secure the snow guards. Place your first staggered pattern of snow guards in, every other panel flat, along the Eave Strut (6" from the bottom edge of the decking). Then move up to the first purlin above the eave strut (1 foot up from the bottom edge on decking) and place a snow guard in the center of each valley, alternating from the row below to create a staggered pattern that spans across the entire roof. Move up the roof every 6 feet and repeat the same staggered pattern of guards across the entire roof. Do not exceed 6 feet vertically between staggered patterns of snow guards. When possible, always attempt to divide the roof areas into equal sections, with equal distance between patterns of snow guards. It is highly recommended to screw into a purlin or structural support. This spacing recommendation can be slightly adjusted to accommodate the locations of the structural support and purlins under the metal roof sheets. All upper roof areas must have snow retention installed before installing snow guards on a lower roof. Never isolate areas of snow guards such as just over doorways or vent pipes.
9/12 - 12/12 Roof Pitch
Eave Strut: Horizontal beams that are installed between the roof rafters or trusses and the top plate of the exterior wall.
Panel: Snow guards staggered in every panel flat
Pitch: 9/12 up to 12/12 pitch.
Use: Staggered pattern of snow guards every 5 feet going up the roof.
Snow load: Up to 45 PSF ground snow load.
If your metal roof panels are only mounted on top of purlins or firing strips, the snow guards must be screwed into the purlins or firing strips. If your metal panels are placed on decking, make sure your decking is adequate to secure the snow guards. Place your first staggered pattern of snow guards in, every other panel flat, along the Eave Strut (6 inches from the bottom edge of the decking). Then move up to the first purlin above the eave strut (1 foot up from the bottom edge on decking) and place a snow guard in the center of each valley, alternating from the row below to create a staggered pattern that spans across the entire roof. Move up the roof every 5 feet and repeat the same staggered pattern of guards across the entire roof. Do not exceed 5 feet vertically between staggered patterns of snow guards. When possible, always attempt to divide the roof areas into equal sections, with equal distance between patterns of snow guards. It is highly recommended to screw into a purlin or structural support. This spacing recommendation can be slightly adjusted to accommodate the locations of the structural support and purlins under the metal roof sheets. All upper roof areas must have snow retention installed before installing snow guards on a lower roof. Never isolate areas of snow guards such as just over doorways or vent pipes.
Disclaimer
This page may be used only for the purpose of developing plans, specifications, and/or approval drawings for construction projects utilizing only IceBlox, Inc. manufactured or distributed products and components. It is to be used only as a quick reference for estimating snow guard quantities and placement on roofs with less than 45 PSF ground snow load.
IceBlox Inc., d.b.a SnoBlox-Snojax, referred to hereafter as IceBlox, Inc., or any subsidiary brands or companies, is not responsible for estimates or purchases resulting from the erroneous or improper use of this page or snowguardspacingtool.com.
The user shall determine the suitability of the product for its intended use and assumes all risks of its use or handling. In regards to spacing guidelines, quotations and or layouts, Iceblox, Inc. will not be held liable for incorrect material quantities not recommended on snowguardspacingtool.com and/or SnoBlox-Snojax.com
SnoCleat PBR Spacing Frequently Asked Questions (FAQs)
Always guarantee that the substrate beneath the roof sheet is sufficient for the mechanical attachment of the SnoCleat PBR. The SnoCleat PBR must be fastened through the roof sheet and into metal purlins or a minimum of 1.5" thick wood substrate.
A user-supplied 2" x 4" sheet of metal roofing may be attached to the SnoCleat PBR snow guard's face. Custom powder coating is available at an additional cost. A physical color sample is often needed for precise color matching when a bespoke finish is requested. Call us at 1-800-766-5291 for information on pricing and availability. Color-matched guards typically require 3-4 weeks for production and are not kept in stock. Customers can get the SnoCleat PBR in mill finish and either paint them when they arrive or have them coated locally if they prefer a more economical or quicker option.
The six pre-drilled holes on the SnoCleat PBR should face up the slope. Install into three of those holes in an alternating 's' pattern. You can install more screws into the remaining holes to strengthen the hold. These supplemental fasteners are handy when your wood decking is the only structural support and connecting to purlins is not an option. Never attach SnoCleat PBR to just the metal roof panels.
Installers place the SnoCleat PBR in the panel flat, centering it between the minor ribs. Do not install the snow guard on top of the minor or major ribs, as doing so will crush the rib and damage the panel. Additionally, installing the SnoCleat PBR on top of a high rib should never be done. Once the snow and ice become lower than the snow guard, it will slide down the flats of the panel and render the guard ineffective.
Use one of our two recommended screws to install the SnoCleat PBR, depending on the material of your structure. If you are attaching to metal purlins, use the 1.5" Master Drillers; if you are attaching to wood purlins or decking, use the 2" Master Grippers.
The SnoCleat PBR only serves as snow retention. We NEVER recommend using any snow guard or snow rail system as a step or a tie-off point for fall protection. If you are looking for a fast and secure fall protection solution, we recommend checking out the RidgePro.
Installing snow guards in small, isolated areas is never recommended. Doing this will typically result in the guards becoming overloaded and tearing away from the roof, causing damage to the guard, the roof panel, and the structure underneath. Suppose you want a solution to protect your chimney or vent pipe. In that case, we recommend checking out our VentSaver options.