Purlin Spacing and Snow Guard Placement for Screw-Down Mounting
Buildings with metal roofing generally have wood or steel purlins spaced 2 to 5 feet apart along the roof. Residential structures usually have 1x3 purlins spaced 24 to 36 inches apart from the ridge to the eave. The most common way to install snow guards on a building with screw-down metal roofing is to screw through the roof into the purlins below the roof sheet. Purlins, which always run horizontally across the structure, are not to be confused with rafters that run vertically up the structure. To achieve proper spacing for snow guards, it is always advisable to fasten the snow guards to the purlins in a staggered pattern, no more than 12 inches up and down. Rafters are often spaced up to 24 inches apart, making it impractical to space snow guards properly for satisfactory results. For this reason, the only acceptable design for a snow guard is to have its mounting points aligned horizontally on the base.
Top of Page
Choosing the Right Snow Guard System for Your Metal Roof
We recommend using our pad-style screw-down snow guards for this application. The larger snow guards work best for this type of fastener on a thin plywood or OSB deck. In regions that see heavy snow, over 45 psf, bar-style snow rails provide greater strength and help spread the snow load evenly across the roof. Before picking a system, make sure the snow guard you choose fits your roof panel profile and meets the snow load rating for your roof. Check out our snow guard spacing guide for clear advice on layout, spacing, and compatibility.
Pro Tip: Plan for Ice & Water Shield: If you're installing a new roof, consider adding ice and water shield beneath the panel in areas where snow guards will be mounted. This rubberized asphalt membrane adds an extra layer of protection against moisture intrusion around penetrations.
Top of Page
Installation Instructions by Substrate Type
Verify the substrate below the roof panel. If you have metal purlins, use a self-drilling screw that will drill through the snow guard into the purlin below. If you have wood purlins, use a self-tapping wood screw to screw the snow guard into. If you're installing over plywood or OSB, make sure to install wood blocking beneath it. If this is not possible, consider fastening the snow guards with Fab-Lok fasteners.
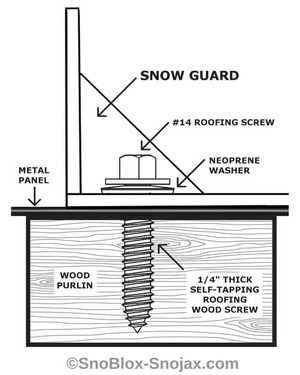
Installing Screw-Down Snow Guards on Wood Purlins
-
Determine the spacing recommendations required for your snow guards, then mark the corresponding spots on the roof. Take time to check the pitch, measure your panel lengths, and review local building codes to understand the snow loads your roof needs to handle. Don't screw snow guards into floating standing seam panels. Doing so can damage the roof and go against industry best practices. If unsure of proper spacing, refer to our screw down snow guard spacing guide.
-
Choose the type and length of your screw. Verify the thickness of the wood purlin beneath the metal panel to select the length of your roofing screw. Ideally, the wood purlin should be between 1 1/2 and 2 inches thick. Take into account whether insulation is located beneath the panel and the thickness of the snow guard's base when determining the length of the screw. Always use an exterior self-tapping wood screw that is at least a #14 (1/4 inch thick) with a pre-installed neoprene washer under the head.
-
If the snow guard contains pre-drilled starter holes, enlarge them enough to allow the fastener to pass through. Snow guards, such as the Snojax I, SnowCatcher, SnoCleat PBR, SnoBar, and ColorBar, come with pre-drilled holes, eliminating the need for pre-drilling when using these models. This step is not necessary for the Ecojax Peel-Stick-and-Screw snow guards.
-
Mark the mounting locations over the purlins and clean the panel areas where the snow guards will be mounted. If using peel-stick-and-screw-down Ecojax snow guards, peel the 3M backing off, press the guard onto the panel in the pre-marked area for about 10 seconds, and drive the screws through the starter points in the snow guard into the wood purlin below. Do not compress the rubber washers under the screw heads by more than 50%. (When installing snow guards that have a sealer pad or require a silicone sealant, continue to the next step.)
-
Depending on the model, apply the foam gasket or silicone to the base of the snow guard. The SnowCatcher, SnoCleat PBR, SnoBar, and ColorBar come with peel-n-stick foam gaskets, which are fast and easy to install. All other snow guards require the base to be completely covered with a high-quality metal roofing silicone to make a watertight seal.
-
Screw down the snow guard. Position the snow guard on the pre-marked panel locations (as per step 4) and secure it with screws through the pre-drilled holes (as per step 3) in the snow guard, fastening into the wood purlin below. Turn the screw until the neoprene washer flattens to roughly half its original thickness. That's your sweet spot for a secure, leak-resistant seal that is tight enough to hold, but not so tight that it stresses the washer or panel.
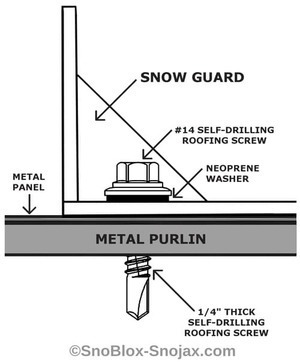
Installing Screw-Down Snow Guards on Metal Purlins
-
Determine the appropriate spacing for snow guards on your roof. Select a snow guard system specifically designed for screw-down installation on metal roofs. Never screw into a floating standing seam metal roof.
-
Choose the proper roofing screw for this application. Confirm that the purlin located beneath the steel roofing panel is metal. Select a screw length that's long enough to penetrate any insulation and still reach solid support. Don't forget to factor in the height of the snow guard's base when making your selection. Always use a self-drilling screw that is at least #14 gauge (1/4 inch thick) and has a built-in neoprene washer under the head.
-
If the snow guard has pre-drilled starter points, enlarge them to allow the fastener to pass through without binding. Snow guards, such as Snojax I, SnowCatcher, SnoCleat PBR, SnoBar, and ColorBar, feature pre-drilled holes, eliminating the need for additional pre-drilling. Ecojax Peel-Stick-and-Screw snow guards install directly, eliminating the need for pre-drilling or sealant.
-
Mark the mounting points directly over the purlins, then clean the panel surfaces where each snow guard will go. If you are installing snow guards with a sealer pad or those that require silicone sealant, proceed to the next step. For Ecojax Peel-Stick-and-Screw models, remove the 3M backing, press the guard firmly onto the marked panel area for about 10 seconds, then drive the self-drilling screws through the starter holes into the metal purlin beneath. Tighten the screws firmly until the rubber washers compress to exactly 50% of their original thickness. Ensure that the pressure is even across all washers to maintain a proper seal and prevent leaks.
-
Depending on the model, apply either the included foam gasket or silicone to the base of the snow guard. The SnowCatcher, SnoCleat PBR, SnoBar, and ColorBar feature peel-and-stick foam gaskets, making installation quick and easy. To ensure a watertight seal, all other snow guards must have their bases completely covered with high-quality metal roofing silicone.
-
Screw down the snow guard into the metal purlin below the roof panel. Place the snow guard on the designated panel locations marked in step 4. Secure it by inserting screws through the pre-drilled holes in the snow guard, into the metal panel, and the metal purlin underneath. Tighten the screws holding the snow guard just enough to compress the rubber washers to about 50%.
Installing Snow Guards on Plywood or OSB Roof Decks with Wood Blocking
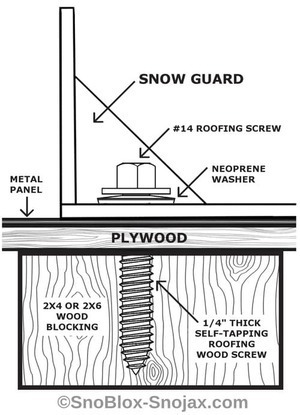
Pro Tip: Plywood or OSB sheathing alone typically doesn't provide sufficient holding power for screws to secure the snow guard under load. Install the snow guards in the same manner as you would screw them into wood purlins, as outlined above, but add 2x4 or 2x6 wood blocking beneath the plywood or OSB decking before beginning the installation.
-
Review recommendations for the spacing of screw down snow guards on exposed fastener metal roofs. Select a snow metal roof retention system specifically designed for roofs with visible screws, and refrain from attaching anything through a standing seam metal panel.
-
Determine the length of your screw. Measure the thickness of the plywood or OSB under the metal panel. The wood blocking should be a 2x4 or 2x6 piece of wood, which will add approximately 1 1/2 inches of thickness. Also, consider if there is insulation under the panel and the thickness of the snow guard's base when deciding on the screw length. Always use a self-tapping wood screw that is at least #14 (1/4 inch thick) with a neoprene washer already installed under the head.
-
Pre-drill the snow guard to accommodate the fastener, then create a small pilot hole in the roof at the mounting location. Drill out the starter hole in the snow guard if no holes are already present. Next, pre-drill a small pilot hole in the panel to identify where blocking will be installed from the attic space. Be sure to clean the panel and snow guards after drilling the holes.
-
Install wood blocking under the plywood or OSB where you drilled pilot holes in the previous step. Install the blocking between the rafters with an ultra-quick gripping construction adhesive. Ensure the length of the blocking fits snugly between the rafters to help keep the wood in place while the construction adhesive cures.
-
Screw the snow guards down using the pre-drilled pilot hole as your guide. If using peel-stick-and screw Ecojax snow guards, peel the 3m backing off, press the guard on the panel with one starter point positioned over the pre-drilled hole from step 3. Run the screws until the neoprene washer is seated to approximately 50% compression. If you are using the SnowCatcher, SnoCleat PBR, SnoBar, and ColorBar, apply peel-and-stick foam gaskets to the base of the guard. If using a snow guard without sealer pads, completely cover the underside of the snow guard with an exterior-grade silicone sealant. Place the snow guard on the panel and tighten the screws on the snow guard just enough to compress the rubber washers no more than 50%. Snow guards installed with silicone sealant should have a generous amount of squeeze-out around the perimeter of the guard. It is advisable to finger-wipe (with gloves) all the way around the perimeter to create a weather-tight seal.
Installing Snow Guards on on Plywood or OSB Using Fab-Lok Fasteners
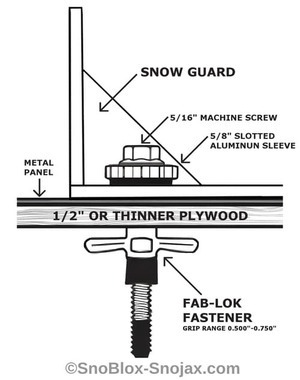
Snow guards are essential for protecting walkways, gutters, people, pets, and property from sudden snow slides or avalanches that can occur on metal roofs. Installing a roof over a plywood or OSB deck without purlins or structural supports directly under the panel ribs makes attaching screw-down snow guards more complex than just using a drill and hoping for the best. This method is especially useful when you can't reinforce with wood blocking from below. This attachment method is most effective when working with plywood or OSB substrates that are up to one-half inch thick. Ensure that the base of the snow guard is wide enough to accommodate the Fab-Lok washer and anchor spread.
- Select a suitable snow guard for use with the Fab-Lok fastener. Refer to the chart below for compatible snow guard systems that can utilize the Fab-Lok fasteners.
Pro Tip: Fab-Lok fasteners (DEW DFSEZJ250-200) perform best with plywood or OSB substrates that are ½ inch thick or less, due to their grip range of 0.500 to 0.750 inches.
-
Figure out the proper spacing for your snow guards, then mark those spots on the roof where each one will go. Take a few minutes to check your roof pitch, measure the panel lengths, and review the local building codes for your region so you know how much snow load your roof is designed to handle. Installing screw-down snow guards on floating standing seam panels can damage the roof and may void the warranty. If unsure of proper spacing, refer to our snow guard spacing guide.
-
Drill 5/16-inch to 11/32-inch holes through the holes or starter points in the snow guard, panel, and plywood or OSB at the marked locations from step 1. Confirm that the Fab-Lok can pass through the hole in the snow guard without binding.
-
Clean the snow guard and panel surface thoroughly to remove shavings, dust, oil, or debris. A clean, dry surface ensures proper sealing of the gasket and/or silicone seal under the guard.
-
Apply silicone or place a foam gasket under the snow guard. Apply silicone or place a foam gasket under the snow guard. The SnowCatcher, SnoCleat PBR, SnoBar, and ColorBar include peel-and-stick foam gaskets that streamline installation and reduce labor time. For models without integrated gaskets, apply a full bed of premium metal roofing silicone beneath the base to achieve a reliable, watertight seal.
-
Install snow guards or snow rails with the Fab-Lok fastener. Position the snow guard over the pre-drilled holes and align it properly with the holes in the pre-drilled panel. Insert the Fab-Lok fastener through the snow guard base and into the hole until the rubber washer is tight against the guard. Tighten the screw head with a 5/16 nut driver while holding the collar of the aluminum sleeve with a box wrench. The recommended torque setting is 40 in-lbs. As you screw the bolt in, the blind-side anchor expands beneath the plywood or OSB, locking the fastener in place.
Top of Page
Summary and Key Takeaways
When installed properly, screw-down snow guards effectively prevent snow and ice from suddenly sliding off a metal roof. Use quality screws, follow a staggered layout, and fasten each guard to a solid wood or metal support beneath the panel.
Always follow the spacing guidelines for your roof pitch and panel width. If you're not sure where to start, check our screw down snow guard spacing guide for detailed charts and layouts. A good snow guard layout spreads the snow load evenly and helps mitigate snow slides on your roof shed year after year.
Need help choosing the right setup? Please take a look at our pad-style screw-down snow guards or bar-style snow rails, or request a quick quote for your project.
Top of Page