
Spacing for SnowBreaker Snow Guards
In regions that experience winter precipitation, lingering snow and ice on smooth, coated metal roofing can create extremely dangerous avalanche conditions. SnowBreaker snow guards reduce this risk by breaking up sliding snow and ice before it can release in large, destructive sheets.
Proper SnowBreaker spacing relies on even distribution across the entire roof area to prevent snow and ice from shifting initially. A single row of guards along the eave or gutter edge is not always sufficient. When frozen precipitation releases from a metal roof, everything below is at risk.
Isolating snow guards on partial roof sections—such as only above doorways or roof vents—is not recommended. Snow guards should be installed across the entire roof plane to control snow movement safely. All upper roof areas must have snow retention installed before placing snow guards on a lower roof section. Limited isolated use may be acceptable in areas with ground snow loads below 20 PSF. Refer to the SnowBreaker Spacing Chart for Isolated Areas.
The spacing guidelines on this page apply only to SnowBreaker quantities and their placement on roofs with a ground snow load of up to 45 PSF. These guidelines do not account for snow drifting, snow shadows, or unusual weather conditions. Always consult a qualified architect or engineer for project-specific recommendations.
Since the pointed SnoBreaker's face does not hold snow or ice in place, it breaks it into smaller pieces to prevent sudden release. For projects exceeding 45 PSF, submit a Quote Request for engineered SnoBar® or ColorBar snow rail systems.
Rows
SnowBreakers / Row
Total
Cost
Disclaimer
The calculator provides an estimated quantity and layout for SnowBreaker snow guards, assuming typical roof conditions and a ground snow load of up to 45 PSF. Use the results for preliminary planning purposes only. Install screw-mounted snow guards over purlins or a solid surface, such as wood blocking. Verify the time and temperature requirements of the adhesive and 3M attachment methods.
The proper spacing depends on your roof criteria. Factors such as panel profile, roof condition, building design, exposure, and local snow loads all play a role. Before you start, check with the manufacturer to confirm the spacing for your system. Do not position snow guards just above doors, walkways, or lone roof sections unless you are following the SnowBreaker Spacing Chart for Isolated Area.
IceBlox, Inc. shall not be held liable for any erroneous calculations, misinterpretations, or outcomes resulting from misuse of the calculator, reliance on its output, or the entry of incorrect, incomplete, or assumed data. Use the results for preliminary planning purposes only.
For system-engineered layouts or roofs with a ground snow load above 45 PSF, request a SnoBar®/ColorBar system quote.
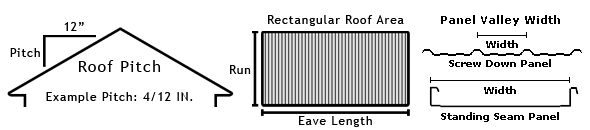
Recommended SnowBreaker Spacing by Roof Pitch


1/12 – 2/12 Roof Pitch
SnowBreaker spacing for 1/12–2/12 pitch roofs up to 45 PSF. Install SnowBreakers evenly across the roof to break up snow and ice into manageable pieces before it gains momentum. Begin approximately 1 ft up from the bottom edge.
- ≤16" valleys: Use 1 SnowBreaker per valley every 20 ft going up the roof. Place each guard in the center of the valley, install a row, then repeat at ~20 ft vertical intervals. Do not exceed 20 ft between rows.
- ≥17" valleys: Use 2 SnowBreakers per valley every 20 ft going up the roof. Place guards at evenly spaced intervals in the valley, run a row, and repeat at ~20 ft vertical intervals. Do not exceed 20 ft between rows.
3/12 – 4/12 Roof Pitch
For 3/12–4/12 roofs up to 45 PSF. These moderate slopes increase the chance of snow movement. Position the SnowBreakers to disrupt the flow of snow before it gains momentum.
- ≤16" valleys: Use 1 SnowBreaker per valley every 15 ft going up the roof. Begin ~1 ft up from the bottom edge and repeat at ~15 ft vertical intervals. Do not exceed 15 ft between rows.
- ≥17" valleys: Use 2 SnowBreakers per valley every 15 ft going up the roof. Place two equally spaced in the valley, continue rows every ~15 ft. Do not exceed 15 ft vertically between rows.
5/12 – 6/12 Roof Pitch
Steeper 5/12–6/12 roofs on shed snow faster; closer vertical spacing ensures SnowBreakers break snow sheets before they gain dangerous momentum. This recommendation is for ground snow loads less than 45 PSF.
- ≤16" valleys: Use 1 SnowBreaker per valley every 8 ft going up the roof. Start ~1 ft up from the bottom edge and repeat rows every ~8 ft vertically. Do not exceed 8 ft between rows.
- ≥17" valleys: Use 2 SnowBreakers per valley every 8 ft going up the roof. Place two equally spaced in the valley, continue rows every ~8 ft. Do not exceed 8 ft between rows.
7/12 – 12/12 Roof Pitch
For 7/12–12/12 in snow load rating zones of less than 45 PSF. These are considered steep roofs and snow accelerates quickly as it sheds. SnowBreakers need the tightest spacing to fragment snow and ice effectively.
- ≤16" valleys: Use 1 SnowBreaker per valley every approximately 5 ft going up the roof. Start ~1 ft up from the bottom edge and continue rows every ~5 ft. Do not exceed 5 ft between rows.
- ≥17" valleys: 2Use 2 SnowBreakers per valley every approximately 5 ft going up the roof. Place two equally spaced in each valley, continue rows every ~5 ft. Do not exceed 5 ft between rows.
SnowBreaker Spacing Frequently Asked Questions (FAQs)
The SnowBreakers, when installed with the pointed side facing up the slope, break up the snow and ice and help mitigate damages caused by snow slides. The SnowBreaker's revolutionary shape allows it to be installed in the opposite-facing direction for use as a snow guard. You should not use this chart for spacing recommendations with the SnowBreaker pointed downward. Please use either the glue-down or screw-down spacing charts when installing SnowBreaker in this way.
Except for Snojax 1, all of our clear polycarbonate snow guards are compatible with adhesive installation. Snojax 1, the first original clear guard in the world, should not be used with standing seam panels since it is only compatible with installation via mechanical fasteners. However, you can use fasteners to install all of our guards on screw-down panels.
We only advise using Surebond SB-190 adhesive when gluing down our snow guards. This adhesive is the industry standard for use with polycarbonate snow guards. Surebond SB-190 creates a chemical fusion bond with our guards, producing a robust and durable attachment between the snow guard and the metal roof panel.
We recommend using the 3M mounting option for our SnowBreaker snow guard, primarily in situations that require a non-penetrating solution but where low temperatures prevent proper adhesive curing times. The Surebond SB-190 adhesive requires approximately 28 days at 50 degrees (Fahrenheit) or above to achieve a total cure. SnowBreakers mounted with the 3M should be removed and reapplied with adhesive once the temperatures rise again.
For polycarbonate snow guards, the Surebond SB-190 glue needs approximately 28 days at 50 degrees Fahrenheit to cure fully. Temporary temperatures below that will prevent the curing process from progressing, which may increase the time required for a complete cure. Rain (after 45 minutes) and lower temperatures won't harm the adhesive during curing.
You can attach about 10 of our larger polycarbonate snow guards or 20–25 of our smaller models using the Surebond SB-190 adhesive. When you use the SnowBreaker 3M, we provide a tube for every 50 units to seal the perimeter edges. Please note that your specific application may require different quantities.
How SnowBreaker Snow Guards Work
What does a SnowBreaker snow guard do?
A SnowBreaker snow guard breaks sliding snow and ice into smaller pieces as it moves down a metal roof, reducing the risk of a sudden, dangerous avalanche.
Do SnowBreaker snow guards hold snow on the roof?
No. The pointed face of the SnowBreaker will not hold snow or ice in place for any amount of time. They fragment moving snow, releasing it gradually, in smaller pieces rather than all at once.
Can SnowBreakers be installed only above doorways or walkways?
In most cases, no. Control snow slides across the entire roof plane to be effective. Isolating snow guards to partial roof areas is generally not recommended, except in very low snow load conditions. If you have a 20 PSF or lower snow load, please refer to the SnowBreaker Spacing Chart for Isolated Areas.
When should a snow rail system be used instead of SnowBreakers?
Install snow rail systems such as SnoBar® or ColorBar when snow must be retained on the roof, when ground snow loads exceed 45 PSF, or when engineering requirements call for load-holding snow retention.
Does roof pitch affect how SnowBreakers perform?
Yes. As the roof pitch increases, space the rows of SnowBreaker closer together as you go up the roof to effectively break up the snow and ice before it gains momentum.
Does panel profile influence SnowBreaker performance?
Yes. Roof panels with wider valleys generally require 2 SnowBreakers per row to disrupt snow movement effectively.
Is this SnowBreaker spacing guide considered engineered?
No. The intention of this spacing guide is as a general reference only. Site-specific conditions may require engineered snow retention solutions.
When is an engineer required for snow retention design?
Consult an engineer when ground snow loads exceed 45 PSF, roof geometry is complex, snow drifting occurs, or public safety and code compliance are concerns.
Snow Breaks for Sloped Metal Roofing
