
SnowBreaker Isolated Snow Guard Placement Guide
Isolated SnowBreaker snow guards break snow and ice into smaller, safer pieces as it moves down a sloped metal panel. A single row at the eave is rarely sufficient. Snow loads need to be evenly distributed across the roof surface to minimize the risk of dangerous sliding snow.
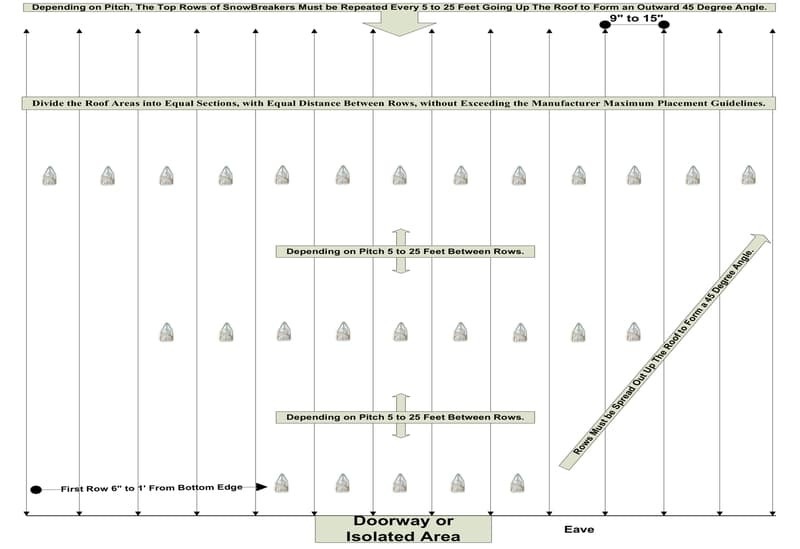
How to Use Isolated SnowBreaker Snow Guards
SnowBreaker Spacing for Isolated Roof Area Calculator
Isolated SnowBreaker spacing for 20 PSF or lower snow loads. Row 1 is fixed at 1 ft except for screw-down applications, begin at the end wall intersection.
Isolated SnowBreaker spacing for 20 PSF or lower snow loads. Row 1 is fixed at 1 ft except for screw-down applications, begin at the end wall intersection.
Disclaimer
The calculator provides an estimated quantity and layout for isolated placement of SnowBreaker snow guards, assuming typical roof conditions and a ground snow load of up to 20 PSF. Use the results for preliminary planning purposes only. Install screw-mounted snow guards over purlins or a solid surface, such as wood blocking. Verify the time and temperature requirements of the adhesive and 3M Peel-n-Stick attachment methods.
The proper spacing depends on your roof criteria. Factors such as panel profile, roof condition, building design, exposure, and local snow loads all play a role.
IceBlox, Inc. shall not be held liable for any erroneous calculations, misinterpretations, or outcomes resulting from misuse of the calculator.
When to Use Isolated Placement
Many customers choose isolated placement of snow guards due to budget limits or concerns about overloading the roof with a full snow guard system. Always keep in mind that the SnowBreaker is not designed to hold large snow loads but rather to break them up as the snow and ice start to melt. This application may not always be ideal for pedestrian walkways. Use isolated installations only in areas where ground snow loads do not exceed 20 PSF. For regions with higher snow loads up to 45 PSF, consider using Full Coverage SnowBreaker Systems.
SnowBreaker Spacing by Roof Pitch
1/12 – 2/12 Roof Pitch
- One SnowBreaker per valley if valley width is under 16″
- Two SnowBreakers per valley if valley width exceeds 16″
- Rows spaced approximately 20 ft up the roof
- Units installed at a 45° outward angle from the eave
Begin guard placement roughly 1 ft from the eave for 3M Peel-n-Stick or adhesive installations. For screw-down applications, start at the end-wall intersection. Avoid exceeding 20 ft between rows.
3/12 – 4/12 Roof Pitch
- Same valley rules as above
- Rows spaced approximately 15 ft up the roof
- 45° outward orientation from the width of the door
Begin breaker placement approximately 1 foot from the eave for 3M Peel-n-Stick or adhesive installations. For screw-down applications, start at the intersection of the end wall. Avoid spacing rows more than 15 feet apart.
5/12 – 6/12 Roof Pitch
- One or two units per valley depending on width
- Rows spaced approximately 8 ft up the roof
- Even distribution of breakers across 45° going up the roof
Begin row placement approximately 1 foot from the eave for adhesive or 3M Peel-n-Stick installations. For screw-down applications, start at the end-wall intersection. Avoid exceeding 8 feet between rows.
7/12 – 12/12 Roof Pitch
- One or two units per valley depending on width
- Rows spaced approximately 5 ft up the roof
- Consistent 45° outward alignment expanding the rows going up the roof
Start guard placement approximately 1 foot from the eave for 3M Peel-n-Stick or adhesive installations. For screw-down applications, begin at the intersection with the end wall. Avoid spacing rows more than 5 feet apart.
DisclaimerThis spacing guide is intended for estimating and reference purposes only. It may be used to assist in planning installations of IceBlox, Inc. manufactured products. IceBlox, Inc. assumes no responsibility for site-specific conditions, improper installation, or misuse of this information. Final design responsibility rests with the project professional.
SnowBreaker Choices For Isolated Placements On A Metal Roof

SnowBreaker Isolated Spacing FAQs
Isolated placement of SnowBreaker snow guards occurs when a building owner installs snow slide protection to protect specific areas below the roof, such as doorways, HVAC units, landscaping, or other important areas.
Consider several factors before installing isolated SnowBreaker snow guards on a roof. Since these guards only break up snow and ice, they may not be suitable for all situations. Specifically, they may not provide sufficient protection at doorways with frequent pedestrian traffic, as small amounts of snow and ice will still slide off. This type of installation can save money by mitigating the dangers of sliding snow and ice on partial roof sections in low-snow-load areas.
The Isolated spacing for SnowBreaker proposes a V-Shape pattern at a 45-degree angle. This type of spacing prevents overloading of the bottom rows while protecting the desired width of a partial area below.
No. Isolated installations are not recommended where ground snow loads exceed 20 PSF.