

Spacing For Screw Down Snow Rail Snow Guards on Exposed Fastener Metal Roofs
Screw Down Spacing for SnoBar and ColorBar Snow Rails
Properly spaced screw-down snow rails help keep snow and ice from avalanching off exposed-fastener metal roofs. This guide explains recommended SnoBar® and ColorBar screw-down snow rail spacing for common roof pitches when the ground snow load is up to 45 PSF.
Use this page as a preliminary layout reference only. Always have the project architect, engineer, and roof manufacturer review the final design.
Key Principles for Screw-Down Snow Rail Spacing
- Full roof coverage: Distribute SnoBar or ColorBar rows across the entire roof area to hold the snowpack in place from the top down.
- No isolated areas: Do not install snow rails only over doorways, walkways, chimneys, valleys, or vent pipes. All upper roof areas must have snow retention before any lower sections receive snow guards.
- Equal row spacing: When multiple rows are required, divide the ridge-to-eave run into equal sections so the distance between bars is consistent.
- Bracket attachment: Screw-down brackets must be fastened through the metal panel into structural supports (wood or metal purlins, or adequate decking/OSB blocking) using exterior-grade screws with neoprene washers.
- Panel flats: On screw-down 12-in panel flats, use a bracket in every flat. On screw-down 9-in panel flats, use a bracket in every other flat.
- First row position: Install the first row about 12-in above the drip edge. If there is an unsupported overhang, place the first bar directly above the exterior structural wall or eave strut.
Bracket Layout for 9" and 12" Panel Flats
These diagrams show how SnoBar® and ColorBar brackets align on exposed-fastener 9" and 12" panel flats.
9" Panel Flats
Bracket Every 18"
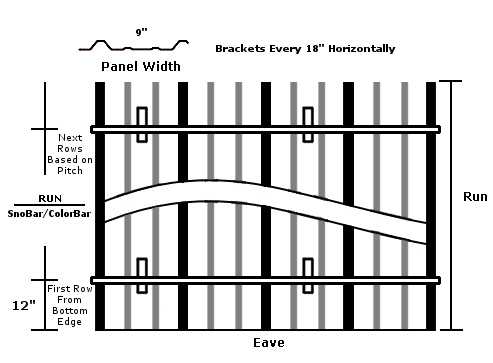
12" Panel Flats
Bracket Every 12"

Keep spacing even and never exceed the manufacturer's maximum distance between rows.
Screw-Down Snow Rail Calculator – SnoBar® & ColorBar
Disclaimer:
Calculator outputs are intended for preliminary reference only and do not constitute engineering advice or guaranteed system performance. Final snow retention system selection, layout, and spacing must be reviewed and confirmed with the roof system manufacturer prior to quoting or installation. IceBlox, Inc. shall not be held liable for any erroneous calculations, misinterpretations, or outcomes resulting from misuse of the calculator, reliance on its output, or the entry of incorrect, incomplete, or assumed data.
- This spacing recommendation is for SnoBar® and ColorBar when the ground snow load does not exceed 45 pounds per square foot (psf). If your snow load is higher, please fill out the Snow Rail Quote Request Form .
- Install the first row of SnoBar® or ColorBar approximately 12 inches above the roof drip edge. If the roof has an unsupported overhang, place the first row directly above the exterior structural wall.
- Space multiple recommended rows equally up the roof run to divide it into equal sections.
- The last bar in each row should span at least two seams and terminate no more than 3 inches past the final seam.
- Screw-down 12-inch panel flats should have a screw-down mounting bracket in every flat. Screw-down 9-inch panel flat should have a screw-down mounting bracket in every other flat. This recommendation does not apply to standing seam SnoBar® and ColorBar.
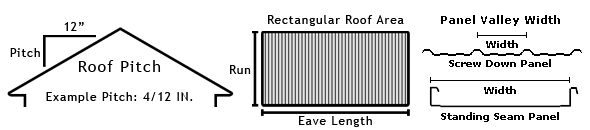
| 1/12 Roof Pitch | 2/12 - 3/12 Pitch | 4/12 - 6/12 Pitch | 6/12 - 7/12 Pitch | 8/12 - 10/12 Pitch | 11/12 - 12/12 Pitch |
1/12 Roof Pitch
Snow creeps slowly on 1/12 roofs but still loads heavily.
- Install rails every 25 ft up the slope.
- First row ~12" above the drip edge.
- Divide rows into equal ridge-to-eave sections.
- No isolated rows.
2/12–3/12 Roof Pitch
- Install rails every 15 ft.
- First row 12-in up from the edge or over the exterior wall or eave strut.
- Do not exceed 15 ft between rows.
- Rows must span the entire roof width.
4/12–6/12 Roof Pitch
Steeper slopes increase sliding forces.
- Install rails every 10 ft.
- Rows must be evenly spaced.
- Confirm the structure can handle load transfer.
6/12–7/12 Roof Pitch
- Install rails every 7.5 ft.
- Equal spacing across the entire roof.
- Rows must extend full width of the roof.
8/12–10/12 Roof Pitch
Sliding forces increase dramatically on steep slopes.
- Install rails every 6 ft.
- Even spacing reduces roof system stress.
11/12–12/12 Roof Pitch
- Install rails every 5 ft.
- Very high sliding forces require tighter intervals.
- Full-width rows across the entire roof is required.
9" Panel Flats
Bracket Every 18"
12" Panel Flats
Bracket Every 12"
Use closer spacing on very steep roofs.
Important Disclaimer
This guide supports SnoBar® and ColorBar screw-down installations for up to 45 PSF ground snow load. It does not account for drifting, sliding snow from upper roofs, ice damming, or other site-specific conditions.
Always consult the project engineer, roof manufacturer, and building codes. IceBlox, Inc. is not responsible for incorrect installation or design assumptions.
SnoBar ColorBar Pricing
Price List for 12 foot SnoBar and ColorBar
Screw Down Snow Rail Spacing Frequently Asked Questions (FAQs)
The SnoBar system consists of a hollow, 1" x 1" square tube constructed of Gator Shield-coated galvanized steel. The ColorBar system uses an extruded 6061-T6 aluminum bar with a channel in the front face that accepts an optional color strip. Both systems can be ordered online with a mill finish or over the phone with a powder-coated finish. Due to its superior strength, the ColorBar can also span panels wider than 24".
A correctly installed snow rail system should prevent roof leaks. Make sure that you use screws with neoprene washers and pair them with our foam gaskets. Occasionally, our customers will choose to outline the perimeter of the colorbracket bases with a bead of neutral curing, cold-weather silicone. This step, however, is not a requirement.
The ColorBrackets come with six pre-drilled holes that should face up the slope. A typical installation pattern uses 3 of those holes in an alternating "s" pattern. You can add additional screws to the remaining holes for increased holding strength. These supplemental fasteners are especially helpful when attachment to purlins is impossible and the only structural support is your wood decking. Snow rails must never be attached just to the metal roof panels.
You can immediately get mill finish, 6-foot SnoBar, and ColorBar kits on our website. We ship 12-foot bars in wooden crates via LTL when you need larger linear footage amounts or a custom powder-coated finish. Our professionals are prepared to give our clients an estimate for these systems. The average turnaround time for price quotes is 24 to 48 hours.
The fasteners for the Screw Down rail system are all self-tapping. Use self-tapping tek screws to secure the bar to the back of the colorbrackets. Installers use the same tek screws on the ColorBar system to attach splice connectors between bars, creating a continuous run. They secure ColorBrackets using either 1.5" Master Drillers for metal purlins or 2" Master Grippers for wood purlins.
Screw Down Snow Rails for Exposed Fastener Metal Roofing


