
Spacing For Screw Down SnowCatcher Snow Guards on Exposed Fastener Metal Roofs
SnowCatcher Metal Snow Guards Spacing Guide
SnowCatcher stainless-steel snow guards protect exposed-fastener metal roofs from sudden sliding snow and ice. Correct spacing prevents dangerous roof avalanches, protects gutters, vehicles, and walkways, and improves the overall long-term safety and performance of the roofing system.
These spacing recommendations apply to roofs with a ground snow load up to 45 PSF. For higher snow loads, you may need a SnoBar® or ColorBar bar-style snow retention system.
Why Proper Snow Guard Spacing Matters
Metal roofing sheds snow rapidly, and once snow or ice begins to move, the momentum can be extremely destructive. For longer panel runs, installing a single pattern of snow guards solely at the eave often cannot bear the sliding loads caused by insufficient snow retention.
SnowCatcher guards perform best when:
- The first pattern of SnowCatcher guards begins on the eave strut or approximately 1 ft up from the eave.
- Install guards in a staggered pattern across alternating panel flats.
- Fasten through the metal panel and into structural decking or purlins.
- Install additional staggered patterns on longer vertical runs when recommended by the manufacturer.
SnowCatcher Spacing & Layout Calculator
Use the calculator below to estimate SnowCatcher quantities and visualize recommended spacing and pattern layout for your specific roof pitch.
Screw-Down SnowCatcher Cost Calculator for Metal Roofs
Estimate how many screw-down SnowCatchers your metal roof will need and the total cost before reviewing the spacing charts below. This calculator uses our recommended spacing for roof pitches between 1/12 and 12/12, assuming the snow guards are installed on solid decking or anchored into purlins or wood blocking. Always position snow guards on the roof in a staggered arrangement.
Results
Model
Rows
Guards/Row
Total
Cost
Disclaimer
The calculator provides an estimated quantity and layout for screw-mounted snow guards, assuming typical roof conditions and a ground snow load of up to 45 PSF. Use the results for preliminary planning purposes only. Install screw-mounted snow guards over purlins or a solid surface, such as wood blocking.
The proper spacing depends on your roof. Things like panel profile, roof condition, building design, exposure, and local snow patterns all play a role. Before you start, check with the manufacturer to confirm the spacing for your system. Don't position snow guards by themselves above doors, walkways, or small roof sections.
IceBlox, Inc. shall not be held liable for any erroneous calculations, misinterpretations, or outcomes resulting from misuse of the calculator, reliance on its output, or the entry of incorrect, incomplete, or assumed data. Use the results for preliminary planning purposes only.
For system-engineered layouts or roofs with a ground snow load above 45 PSF, request a SnoBar® / ColorBar system quote.
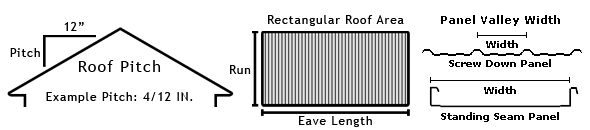
SnowCatcher Spacing Guidelines by Roof Pitch
SnowCatcher guard spacing may change depending on the roof pitch, panel length, and the width of the roof sheet. The recommended SnowCatcher metal snow guard spacing patterns vary with roof pitch. The guidelines below are typical for exposed-fastener metal roofing in regions with a ground snow load up to 45 PSF. Roof geometry, building use, and local codes may require adjustments or custom layouts.

Low-Slope Metal Roofs (1/12 – 2/12 Pitch)
- The first pattern of SnowCatcher guards should be installed over the eave strut and first purlin, or 1 ft and 2 ft up from the eave.
- Additional patterns should be spaced approximately every 25 ft of vertical run.
- Guards should be installed in a staggered pattern across every other panel flat.
- Do not exceed 25 ft between patterns under any circumstances.
- Fasten SnowCatchers into solid decking or purlins for proper load transfer.
Moderate Pitch Metal Roofs (3/12 – 4/12 Pitch)
- The first pattern should be installed over the eave strut and first purlin or 1 ft and 2 ft up from the eave.
- Follow-up patterns should be spaced approximately every 20 ft.
- Use a consistent staggered pattern across alternating panel flats.
- Divide the roof into equal vertical sections whenever possible for a balanced layout.
Semi-Steep Metal Roofs (5/12 – 6/12 Pitch)

Steep Metal Roofs (7/12 – 8/12 Pitch)
Very Steep Metal Roofs (9/12 – 12/12 Pitch)
- Begin the first pattern over the eave strut and first purlin, or 6 in and 1 ft up from the eave.
- Place additional patterns about every 5 ft due to the rapid acceleration of sliding snow and ice on steeper slopes.
- Maintain a consistent staggered spacing pattern across panel flats.
Installation Principles for SnowCatcher Metal Snow Guards
Attach Only with Screws
Secure SnowCatcher metal snow guards to the roof using #14 metal roofing screws with a neoprene washer under the screw head. Adhesive mounting is for polycarbonate snow guards only and is not suitable for use on SnowCatcher units. for stainless steel SnowCatcher units.
Fasten into Structural Support or Wood Blocking
Always fasten through the panel into solid structural material such as 1.5-inch or thicker decking, wood blocking, or purlins. The substrate must be capable of transferring the snow and ice loads to the building structure. For more information, see How to Install Screw-Down Snow Guards on Metal Roofs.
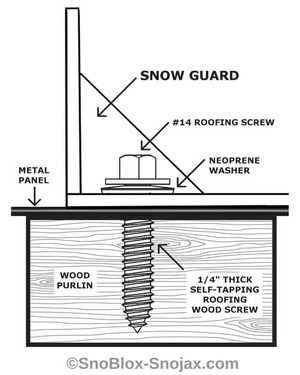
Pad-Style Snow Guards Fastened to Wood Purlins
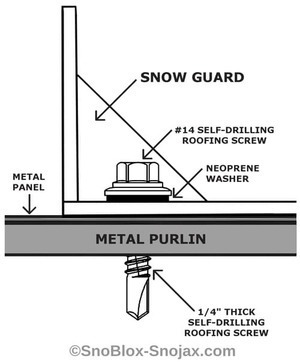
Pad-Style Snow Guards Fastened to Metal Purlins
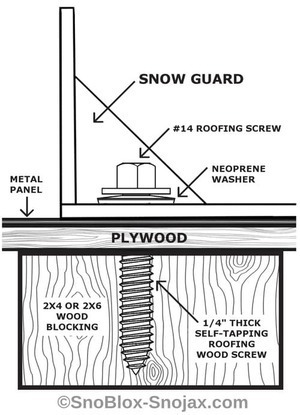
Pad-Style Snow Guards on Plywood / OSB Decks with Blocking
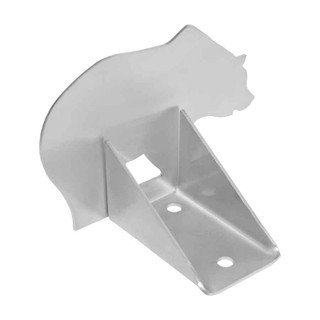
Use the Correct Mounting Holes
The two holes near the face of the SnowCatcher are the primary fastener locations. The third hole is primarily used for hanging during powder coating but may be used as an additional fastener point if desired.
Install Upper Sections of Snow Guards Before Lower Sections
Effective snow retention starts at the upper portions of a long, sloped roof. Always install snow guards on upper areas so the lower regions don't carry the entire snow load or face sudden movement of snow and ice.
Maintain Even Distribution
Layouts that are too wide or inconsistent can weaken performance. Maintain an even, staggered pattern that works hand-in-hand with the spacing guidelines and calculator results for your roof pitch.
When a Custom Snow Guard Layout Is Recommended
Consider requesting a custom SnowCatcher or SnoBar/ColorBar layout when:
- Your project is located in a heavy snow load region above 45 PSF.
- The roof includes valleys, dormers, offsets, or multiple levels.
- The building uses demand extra safety (public entrances, sidewalks, or vehicle areas).
- The structural substrate varies or is uncertain across the roof area.
Our team can create project-specific metal snow guard price quotes using your roof pitch, panel type, snow load, and verticle roof run dimensions.
Need Help Planning Your SnowCatcher Layout?
Contractors, architects, and building owners can depend on SnoBlox–Snojax for recommendations on suitable metal roof snow retention systems. We provide tailored price quotes based on your roof type, snow load, and budget. Contact us for assistance with SnowCatcher metal snow guards, polycarbonate guards, or SnoBar® and ColorBar snow rail systems.
SnowCatcher Metal Snow Guard Spacing – FAQs
The SnowCatcher snow guard includes three predrilled holes in the base. We require using the two horizontal holes near the guard's face for installation. The two-hole horizontal pattern works on upright or flat purlins. A third hole at the opposite end of the base is primarily for hanging the guard during the optional powder coating process. It also serves as an additional mounting point on wood decking, flat purlins, or wood blocking to increase strength. Avoid installing snow guards with two vertically drilled holes, as they are ineffective. Contractors often install these snow guards over rafters; however, the rafter spacing is generally too wide to ensure proper retention.
Regardless of the snow retention method used, isolated installations are never recommended. Before investing in snow guards, obtain a layout. One of the most important factors to consider when building a system for your project is the weight distribution of roof snow and ice across the whole structure. There is a considerable danger of failure with isolated installations, which could harm the roof's panels, structure, and snow guards. Damage from this could cost tens of thousands of dollars. It is advisable to speak with an architect or engineer before placing an order to ensure proper placement for snow retention.
Only polycarbonate snow guards should be mounted using adhesive. To get the strongest possible hold, Surebond SB-190 etches into the material. We never recommend installing metal pad-style snow guards with adhesive.
Color-matching for the stainless steel SnowCatcher snow guard is available in powder coating. Customers must send us a physical sample for analysis when they desire a bespoke color match. Once we find a match, we will provide a custom quote. Powder-coated orders have a typical lead time of 3-4 weeks for production. We do not keep color-matched guards in stock. Customers desiring a more economical or faster option can order the SnowCatcher in mill finish and either paint them or have them coated locally.
According to our tests, metal and polycarbonate snow guards exhibit comparable test results. Please refer to the resources page for our test results. For our consumers, the choice is frequently more dependent on aesthetics than strength. Roofers can only attach polycarbonate snow guards to standing seam roofs using adhesives.
Only projects in locations with a ground snow load of 45 psf or less should use our snow guardspacing charts. Please get in touch with the local zoning or building permit office if you are unsure of your snow load. Before placing an order, speaking with an architect or engineer is generally advisable. If your project is in an area with a snow load greater than 45 psf, please fill out theSnoBar/ColorBar Price Quote Form.
Yes. Steeper roof pitches require closer row spacing because snow accelerates more quickly. That is why the recommended vertical distance between rows decreases as the pitch increases.
In regions where the ground snow load exceeds 45 PSF, a SnoBar® or ColorBar snow rail system is often the safer and more durable choice. Project-specific engineering layouts are strongly recommended for these applications.
SnowCatcher Stainless Steel Screw Down Snow Guards


Additional SnowCatcher Spacing Questions
How far apart should SnowCatcher snow guards be on a metal roof?
SnowCatcher metal snow guards should be spaced based on roof pitch, panel profile, and local snow load. In most cases, guards are installed in evenly spaced rows across the entire roof surface rather than in a single row at the eave.
Does SnowCatcher spacing change by roof pitch?
Yes. As roof pitch increases, snow loads become more dynamic, which typically requires closer verticle pattern spacing. Low-slope roofs may allow wider vertical spacing of staggered patterns, while steeper roofs often need multiple rows placed closer together.
Is one row of SnowCatcher snow guards enough?
No. A single row at the eave is rarely sufficient on metal roofs. Snow retention systems work best when the load is distributed evenly across the roof to prevent sudden snow and ice release.
Should SnowCatcher snow guards be installed across the entire roof?
Yes. SnowCatcher guards are designed to retain snow where it forms. Spacing guards throughout the roof area reduces shear forces and helps protect gutters, equipment, walkways, and people below.
What happens if snow guards are spaced too far apart?
Improper spacing can overload fasteners, deform metal panels, or allow snow to release between rows. Correct spacing is critical to long-term performance and roof safety.
Do SnowCatcher spacing guidelines replace engineering requirements?
No. Spacing guidelines are general recommendations. Roof design, snow load, and building codes should always be evaluated, and engineering review may be required for high-load conditions.