SnoBar ColorBar 2 Bar Screw-Down Installation Instructions
How to Install SnoBar & ColorBar 2-Bar Screw-Down Snow Rails
These Screw-Down Double Bar SnoBar and Screw-Down Double Bar ColorBar Installation Instructions explain how to install a double-bar snow retention system on exposed-fastener metal roofing panels. This system uses MRM mounting brackets, SC-2B screw-down double bar brackets, and SnoBar or ColorBar rails to help control sliding snow and ice on metal roofs.
Read all instructions, warnings, and design conditions before installing. Each MRM bracket must be fastened through the roof panel and into a structural support, not into the panel alone.
For screw-down 2-bar SnoBar and ColorBar installations, each MRM bracket must be placed on the flat of the exposed-fastener panel and fastened into a purlin or structural support. The first row is commonly positioned 12" to 18" above the eave, with additional rows added according to snow load, roof slope, panel length, and purlin layout.
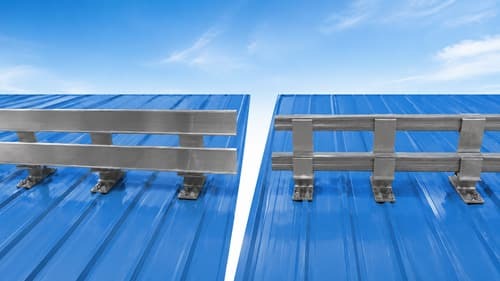
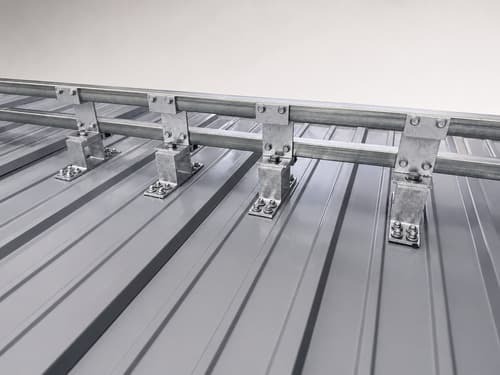
Finished 2-bar SnoBar or ColorBar screw-down system on exposed-fastener metal roofing.
Important Installation Warning
Exposed-fastener metal roof panels carry snow loads through their fasteners into the purlins below. Fasteners that do not hit a purlin provide no load path and will not hold. If the roof panel attachment, purlin location, or structural capacity is uncertain, consult a professional metal roofing installer before proceeding.
Quick Installation Summary
SnoBar and ColorBar 2-bar screw-down systems install by fastening MRM mounting brackets through the exposed-fastener metal roof panel and into a purlin or structural support. SC-2B double bar brackets are then attached to the MRM bases, and the upper and lower snow bars are inserted through the bracket receivers.
The first row is commonly placed 12" to 18" above the eave or over the load-bearing wall. Additional rows may be required depending on snow load, roof slope, panel length, and purlin spacing.
Required Tools
Recommended tools for installing the SnoBar ColorBar 2-bar screw-down snow retention system include:
- Hammer for installing SnoBar plastic end caps
- Drill or impact driver with 3/8" nut driver for #14 screws
- 3/16" Allen bit for tightening set screws
- 9/16" hand wrench for tightening the SC-2B bracket top bolt
- Tape measure
- Chalk line or pencil for marking purlin locations
- Hacksaw
- Deburring file
- Pencil
System Parts
Verify all system parts against the packing slip before starting installation. The system should include:
- #14 woodgrip or self-drilling metal-to-metal fasteners with bonded sealing washers
- SnoBar or ColorBar rails
- End caps, only for SnoBar
- SC-2B screw-down double bar brackets
- Splice connectors, only for connecting multiple ColorBars
- MRM mounting brackets and hardware
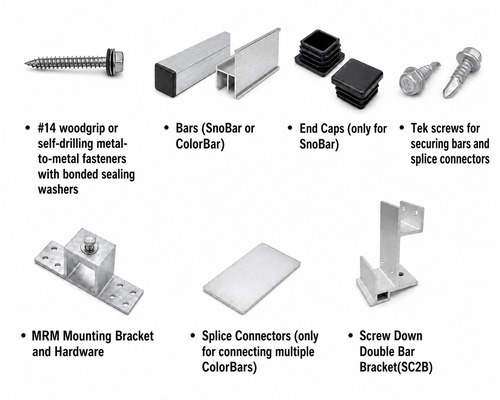
System parts shown with roof fastener, bars, end caps, tek screws, MRM bracket, splice connector, and SC-2B bracket.
Determine the Layout of Rows
Use our screw-down snow rail spacing guide to determine row layout, bracket spacing, and whether additional rows are required. A basic starting point is one row placed 12" to 18" up from the eave, or over the load-bearing wall or first purlin when an overhang is present. Additional rows should be spaced evenly up the roof slope, with every row landing on a structural purlin. Confirm purlin locations before drilling. Each base must be fastened through the panel and into a purlin.
Safety Notice
Make sure all workers are properly harnessed and anchored according to OSHA fall protection guidelines. Never use the SnoBar or ColorBar screw-down snow retention system as a tie-off point.
Installation Instructions
1. Locate the Purlin and Mark Fastener Positions
Measure 12" to 18" up from the eave, or locate the bearing wall or first purlin when required. Mark the base fastener locations with a pencil or chalk line. Each MRM bracket must be anchored through the panel and into a purlin or structural support.
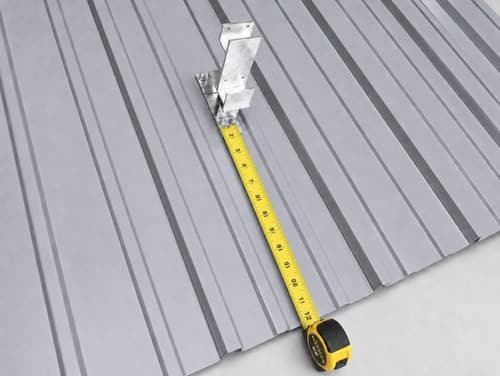
Measuring from the eave and marking the purlin line on the exposed-fastener panel.
2. Position the MRM Bracket and Fasten Through to the Purlin
Set the MRM mounting bracket on the flat of the panel, between minor ribs, at the marked location. Center the bracket over the purlin.
Using a drill or impact driver with a 3/8" nut driver, install the supplied #14 woodgrip screws for wood purlins or #14 self-drilling metal-to-metal screws for steel purlins. Install fasteners through every fastener hole in the base.
Continue installing MRM mounting brackets across the row according to the recommended spacing layout. Typical bracket spacing is 12" to 18" on center, depending on snow load, panel type, and purlin spacing. Every bracket must land on a purlin or structural support.
3. Confirm Bracket Alignment Across the Row
Before installing the bars, confirm that every MRM mounting bracket is aligned across the row, seated flat on the panel, and fastened into a purlin or structural support.
4. Install the SC-2B Screw-Down 2-Bar Bracket to the Top of the MRM Roof Mount.
Install the SC-2B screw-down double bar bracket onto the top of the MRM roof mount bracket. Use a 9/16" hand wrench to tighten the top bolt securely.
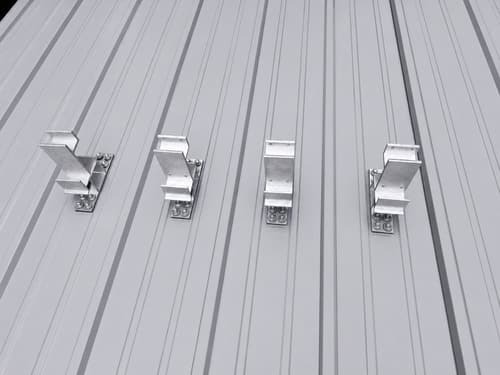
SC-2B brackets mounted on MRM brackets before the bars are installed.
5. Top-Load the Snow Bars into the SC-2B Brackets
Insert a full section of the lower bar into the lower receiver of every SC-2B bracket in the row. Then slide the upper bar through the upper receiver.
The bars should be fully seated in each receiver and run continuously along the row. Do not allow more than 3" of bar to extend past the last base at the end of a row. Do not attach a short bar to a single isolated base.
Two bars seated in the upper and lower receivers of each bracket.
6. Secure the Bars to the SC-2B Brackets
Secure the bars with the supplied tek screws or retaining hardware as required for the system. Confirm that both bars are fully seated and properly retained before moving to the next row or section.
7. Install Splice Connectors to Join ColorBars
For SnoBar, butt joints should be centered between two brackets with no more than a 2" gap between the butted bar ends.
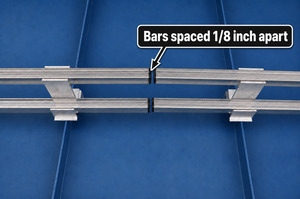
For ColorBar, the supplied splice connectors create a continuous bar run. Butt the ColorBar ends approximately 1/8" apart to allow for thermal expansion and contraction. ColorBar splice connections can be made anywhere along the row except inside a bracket. Install each splice connector with one tek screw.
SnoBar butt joint centered between brackets.
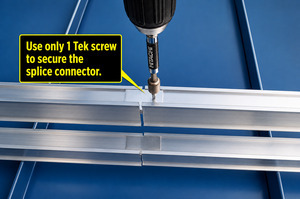
ColorBar splice connector installation.
8. Install End Caps
If using 1" square SnoBar, install the supplied plastic end caps at each end of the bar. Deburr any field-cut bars before installing end caps.
If using aluminum ColorBar, disregard this step.
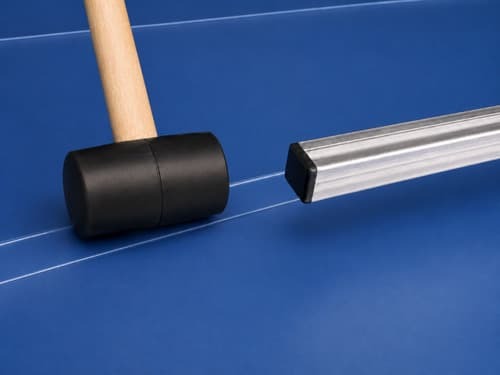
SnoBar end cap installed after cutting and deburring the bar.
9. Lay Out Additional Rows
Space additional rows of SnoBar or ColorBar evenly up the slope according to the recommended layout. Always measure from the eave edge and always land each row on a purlin.
Proper row layout helps control snow and ice movement while distributing load across the roof structure. For spacing assistance, call 800-766-5291.
Design Conditions for Screw-Down Snow Retention
- All snow loads transfer through the roof panel and into the purlins.
- The roof panel attachment, purlin capacity, and supporting structure must be able to withstand retained snow loads.
- Do not install the system in isolated areas only, such as above doorways, vents, or partial roof areas, without special design consideration.
- No snow retention system can retain 100% of snow and ice from falling from a roof.
- The roof system should be a minimum of 26 gauge steel over wood purlins or 24 gauge steel over steel purlins.
- Do not install over loose, pulled, under-driven, or inadequate existing panel fasteners. Correct panel attachment first.
- Row spacing varies by snow load, panel type, roof slope, and purlin spacing.
- More than one row may be required depending on roof conditions and snow load.
Installer and Owner Responsibility
The designer, architect, installer, or owner should understand the local ground snow load, roof slope, panel length, climatic conditions, roof orientation, drifting potential, purlin spacing, and existing panel fastening pattern before installing a SnoBar or ColorBar 2-bar screw-down snow retention system.
Extreme winter conditions, drifting, ice buildup, and unusual snowfall can create conditions beyond the design recommendations of any snow retention system. When extreme buildup occurs, snow and ice should be safely removed from the roof.
Need Help With Layout or Spacing?
SnoBlox-Snojax provides free design assistance for SnoBar and ColorBar snow retention layouts. For help with screw-down double bar spacing, call 800-766-5291 or email support@snojax.com.
SnoBar ColorBar 2-Bar Screw-Down Installation FAQ
SnoBar and ColorBar 2-bar screw-down snow rails are installed by fastening MRM mounting brackets through the exposed-fastener metal roof panel and into a purlin or structural support. SC2B double bar brackets are attached to the MRM bases, and the upper and lower snow bars insert through the bracket receivers.
The first row of SnoBar or ColorBar screw-down snow rails usually installs 12" to 18" above the eave, or over the load-bearing wall or first purlin when an overhang is present. Additional rows may be required based on snow load, roof slope, panel length, and purlin spacing.
Yes. Each MRM bracket fastens through the metal roof panel and into a purlin or structural support. Fastening into the panel alone does not provide the proper holding strength for a screw-down snow retention system.
No. Only install SnoBar and ColorBar 2-bar screw-down systems on exposed-fastener metal roofing. The brackets fasten through the panel and into the structural support, so it is not advisable to use this method on standing seam roof panels.
Bracket spacing for screw-down 2-bar snow rails depends on snow load, roof slope, panel type, purlin spacing, and the recommended layout. Typical spacing is 12" to 18" on center, depending on the width and profile of the roofing panel.
Place a bar in the lower receivers of the SC2B brackets, and then insert the other bar in the upper receivers of the SC2B brackets. Both bars should be fully seated, continuous across the row, and secured with the supplied tek screws.
Center the SnoBar butt joints between two brackets with no more than a 2" gap between the butted bar ends. Deburr the field-cut SnoBar ends before installing the plastic end caps.
ColorBar splice connectors join multiple ColorBar sections into a continuous bar run. Space the ColorBar ends approximately 1/8" apart to allow for thermal expansion and contraction. Install each splice connector with just one tek screw.
Yes. SnoBar rails use plastic end caps at each exposed bar end because the bars are hollow. Aluminum ColorBar does not use SnoBar plastic end caps.
The number of screw-down snow rail rows depends on roof slope, panel length, snow load, purlin spacing, and project layout. More than one row may be required to distribute snow loads properly across the roof structure.