Snow Guard Installation Instructions
Snow guard installation instructions explain how to install adhesive-mounted, screw-mounted, and 3M tape-mounted snow guards on metal roofs. The correct method depends on the snow guard model, roof panel type, and approved attachment method.
Before installation, obtain a snow guard spacing layout and follow the recommended mounting method for your product and roof application.
Proper spacing, surface preparation, sealing, and cure time all affect snow guard performance and long-term reliability.
Jump to:
Adhesive Mounting Screw Mounting 3M Tape Mounting FAQ
Quick Installation Guide
Adhesive Mounting
SnoJax II, SnoBlox, EcoBlox, IceJax and SnowBreaker installation instructions using SureBond SB-190 clear adhesive.
SureBond SB-190 requires 28 full days (672 accumulative hours) of temperatures of 50°F or above to achieve a full cure.
SureBond SB-190 is NOT recommended on copper, lead coated copper or screw mounted applications.
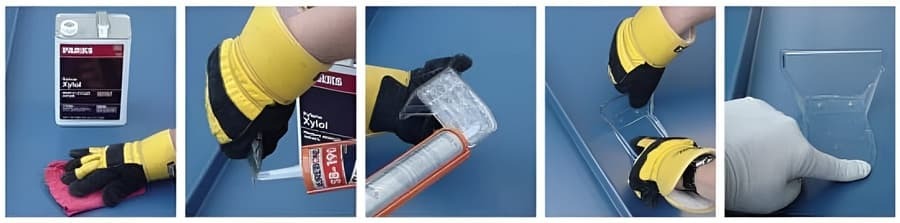
- Clean the roof surface where the guard will be placed with Xylene (Xylol), isopropyl alcohol or panel wipes. Do not allow the cleaner to come in contact with the plastic.
- Allow panel to dry fully. Cut tip, puncture inner seal and generously apply adhesive to the entire base of guard to provide an adequate squeeze-out around the perimeter when the snow guard is pressed firmly onto the panel. When straddling a minor rib with SnoJax II or IceJax, fill the gap to ensure a weathertight seal.
- Place the face of the snow guard toward the roof ridge and press firmly to insure complete adhesion. Finger wipe the entire perimeter to fill any gaps.
Screw Mounting
SnoJax, SnoBlox, EcoBlox, SnowCatcher and SnowBreaker installation instructions using #14 neoprene washered screws and silicone.
A non-acetic neutral curing sealant must be used on bare galvanized or galvalume roofs.
Screw through the guard into a purlin, structural support or at least 2" thick wood blocking.
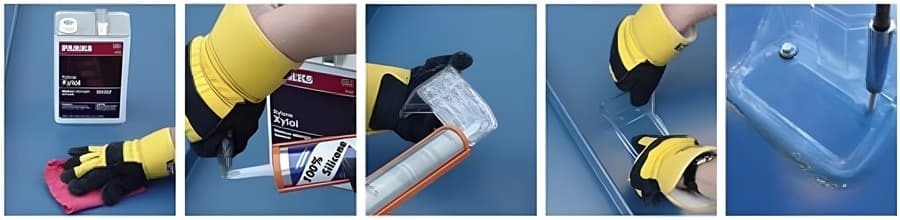
- Clean the roof surface where the guard will be placed with Xylene (Xylol) or isopropyl alcohol. Do not allow the cleaner to come in contact with the plastic.
- Generously apply the silicone to the entire base to provide an adequate squeeze-out around the entire perimeter when the snow guard is fastened firmly onto the panel. When straddling a minor rib with SnoJax I or IceJax, fill the gap to ensure a weathertight seal. If using the SnowCatcher with an EPDM sealer, do not apply silicone to the base; only apply a bead of silicone around perimeter to form a weathertight seal.
- Place the face of the snow guard toward the roof ridge. Use neoprene washered #14 screws to screw through the guard into a purlin, structural support or at least 2" thick wood blocking underneath. Tighten each screw enough to compress the neoprene without overtightening. Finger wipe the perimeter to fill any gaps.
3M Tape Mounting
Instructions for peel and stick installation of SnowBreaker snow guards using 3M tape and SureBond SB-190 clear adhesive.
After installing SnowBreaker snow guards, apply a bead of SureBond SB-190 around the entire perimeter to form a weathertight seal.
3M tape requires temperatures of 35°F or above for 24 hours to achieve full cure.
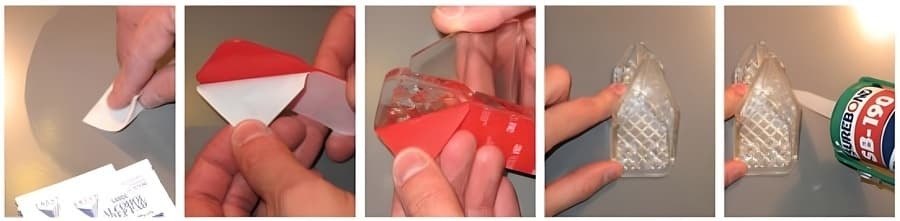
- Clean the roof surface where the guard will be placed with Xylene (Xylol) or isopropyl alcohol. Do not allow the cleaner to come in contact with the plastic.
- Allow panel to dry fully. If the 3M tape is not adhered to the SnowBreaker, remove the white backing from one piece of tape. Align the tape with the guard and press firmly, avoiding bubbles and creases in the tape. Peel the red plastic backing from the base of the SnowBreaker.
- Place the arrows and cutting edge facing uphill. Press and hold firmly for 10 seconds. Apply SureBond SB-190 around perimeter. Finger wipe to form a weathertight seal.
Snow Guard Installation FAQ
Install Snow guards using the mounting method approved for the specific product and roof panel. Depending on the model, installation may use adhesive, mechanical fasteners, or 3M tape with perimeter sealing. The installer must first clean the roof surface, then orient the snow guards correctly, and follow the recommended cure time or fastening method.
Adhesive-mounted snow guards rely on approved adhesive bonding and preoper cure time. Mechanically fasten screw-mounted snow guards into structural support or wood blocking. The correct method depends on the snow guard model, roof panel, and installation requirements.
Yes. SnowBreaker snow guards can be installed using 3M tape when installed according to the SnowBreaker 3M tape instructions. Proper surface preparation, correct uphill orientation, and perimeter sealing are required.
Yes. Before installation, obtain a snow guard spacing layout to ensure proper placement across the roof area, considering panel layout and expected snow load conditions.
SureBond SB-190 requires 28 full days of temperatures at 50°F or above to achieve a full cure. Cure time is important for adhesive-mounted snow guards because performance depends on proper bonding and weather conditions during the curing period.
No. Only install snow guards using the attachment method approved for that specific model. Some products are mounted with adhesives, some with screws, and the SnowBreaker model is the only one mounted with 3M tape when installed according to the approved instructions.
Warranty
The following warranty is made in lieu of all other warranties expressed or implied. Recommendations for proper use of the products are based on tests believed to be reliable. Any goods proven to be defective due to materials will be replaced or purchase price refunded, but in no event shall the manufacturer be responsible for damages in excess of the purchase price. User shall determine the suitability of the product for its intended use and assumes all risk of its use or handling.