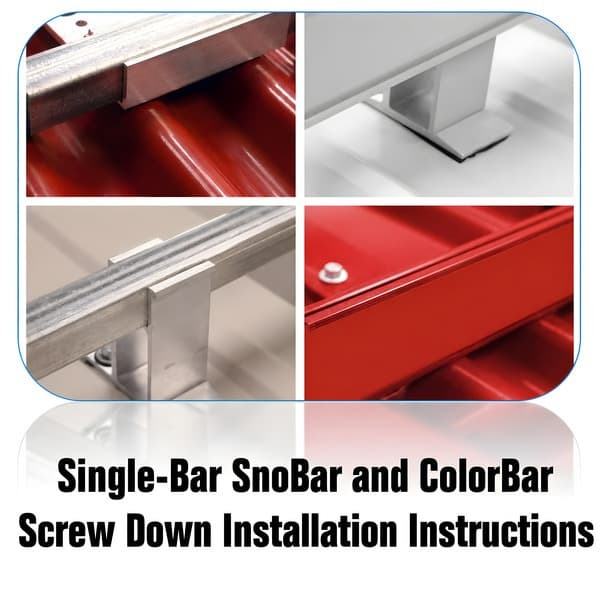
SnoBar & ColorBar Screw-Down Installation Instructions
How to Install SnoBar & ColorBar Screw-Down Snow Retention Systems
These single-bar SnoBar and ColorBar screw-down installation instructions explain how to install a ColorBracket-mounted snow retention system on mechanically fastened metal roofing panels, including exposed-fastener ribbed panels and 2.67 corrugated metal panels.
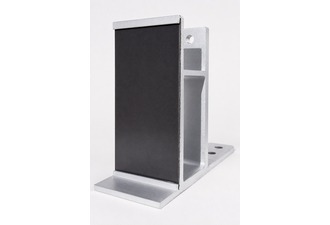
The ColorBracket is a drop-in, screw-mounted bracket that can receive a ColorStrip from the metal roof panel on the bracket's face. Use tall or short ColorBrackets with mechanically fastened metal roofing panels to attach SnoBar or ColorBar directly to the roof structure. The 2.67 ColorBracket mounts SnoBar and ColorBar to wavy 2.67 corrugated metal panels.
Products Covered by These Instructions
These instructions apply to the single-bar SnoBar and ColorBar screw-down systems listed below. Choose the system that matches the roof panel style and bar finish required for the project.
Before Installing the SnoBar or ColorBar ColorBracket System
Read all instructions before beginning installation. Review the design considerations before placing brackets or bars on the roof. Make sure all workers are properly harnessed and anchored according to OSHA fall protection guidelines.
Warning: Never use the SnoBar or ColorBar system as a tie-off point.
Required Tools
- Rubber mallet for inserting SnoBar end caps
- Drill gun
- 3/8-inch nut driver bit for driving 1.5-inch self-drilling screws into steel purlins
- 5/16-inch nut driver bit when using 2-inch wood screws for Tall/Short ColorBrackets or 3-inch wood screws for 2.67 corrugated ColorBrackets mounted into wood purlins
- Tape measure
- Hacksaw
- Deburring file
- Pencil
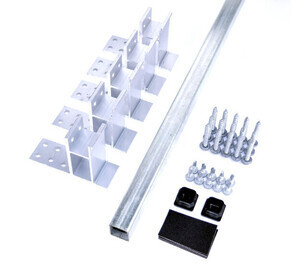
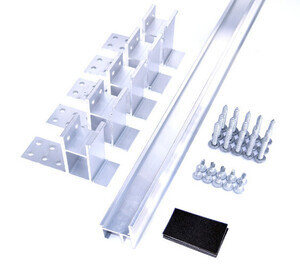
System Parts
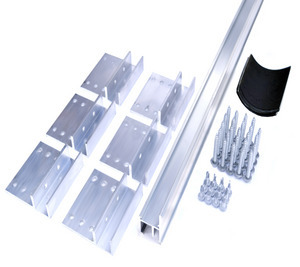
Verify all parts against the packing slip before starting installation.
- ColorBracket mounts with foam gaskets
- SnoBar or ColorBar
- Self-drilling screws
- Three self-drilling screws per Tall/Short ColorBracket or four self-drilling screws per 2.67 ColorBracket
- End caps for SnoBar only
- Splice connectors for ColorBar only
Screw-Down SnoBar Parts:
Screw-Down ColorBar Parts:
Screw-Down 2.67 SnoBar Parts:
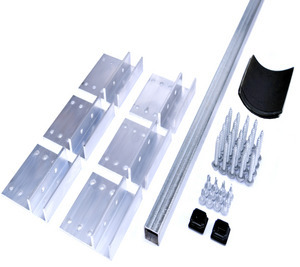
Screw-Down 2.67 ColorBar Parts:
Installation Tips
- Never extend the bar more than 3 inches past the last bracket at the end of a row or where a row terminates in a valley.
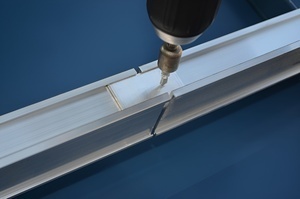
- Bars may need to be cut to length depending on panel width.
- Do not discard cutoffs until the job is complete.
- Short sections of SnoBar or ColorBar must span at least two seams.
- In a continuous run, cutting may be required to avoid ending with a short bar at one seam.
Determine the Row Layout
Follow the screw-down snow rail suggested spacing layout. A basic starting point is one row 12 to 18 inches up from the eave, or over the load-bearing wall when an overhang is present. Place additional rows over purlins or structural supports, spaced evenly up the slope unless a project-specific layout states otherwise.
Always follow the manufacturer’s project-specific design recommendations to validate warranty requirements.
Installation Steps
Step 1: Identify and Mark the First Row of Bar
Based on the layout, measure 12 to 18 inches up the panel from the eave. If the roof has an overhang, place the first row over the load-bearing wall. Mark the farthest panel valley starting at the left. Then mark the same distance from the eave on the next panel valley just short of the length of the bar being installed.
For example, when installing a 6 foot section of bar, the second mark should be just short of 6 feet from the first mark.
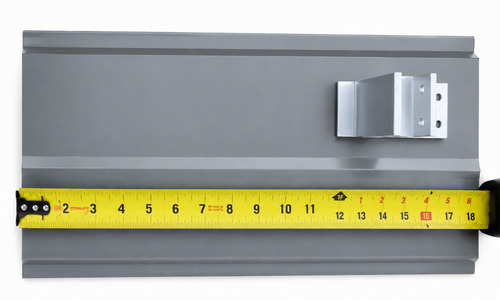
Measuring 12" to 18" up from the eave and marking bracket locations
Step 2: Apply the Foam Gasket and Install the First ColorBrackets
Apply the foam gasket and set the first ColorBracket onto the farthest left seam of the bar section at the first pencil mark. Repeat this step to install a second ColorBracket on the farthest right seam marked in Step 1.
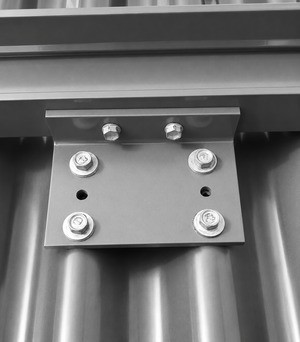
For Tall/Short ColorBrackets, the six bracket holes should face upslope. Use three screws in an S-pattern. For 2.67 ColorBrackets, use four 3-inch screws mounted on top of the ribs in a square pattern through the outside holes. Make sure every screw is fully embedded into the structural material below.
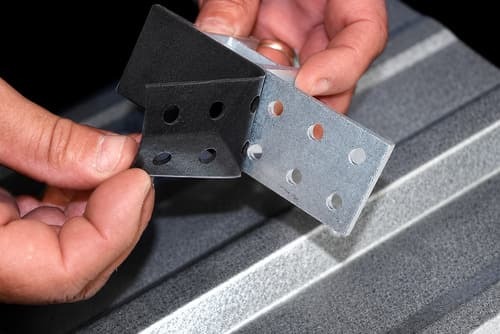
Applying foam gasket to ColorBracket
Tall/Short ColorBracket screw pattern
2.67 corrugated ColorBracket screw pattern
Step 3: Use the Bar as a Straight Edge
Place a full section of bar down into both ColorBrackets. Do not attach the bar to the brackets yet. This bar section will act as a straight edge for installing the remaining ColorBrackets for that section.
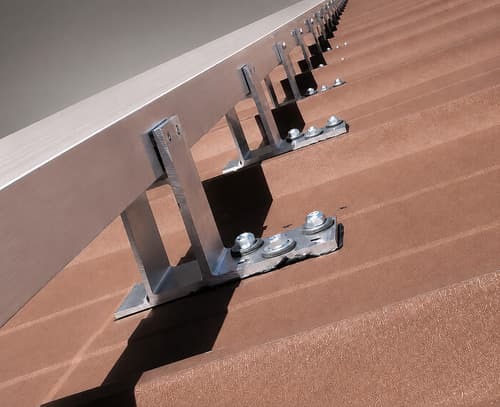
Bar seated in two ColorBrackets and used as a straight edge
Step 4: Install SnoBar End Caps
If using 1-inch square SnoBar, install the supplied plastic end caps at each end of the bar. Deburr any field-cut bars before installing end caps. If using aluminum ColorBar, skip this step.
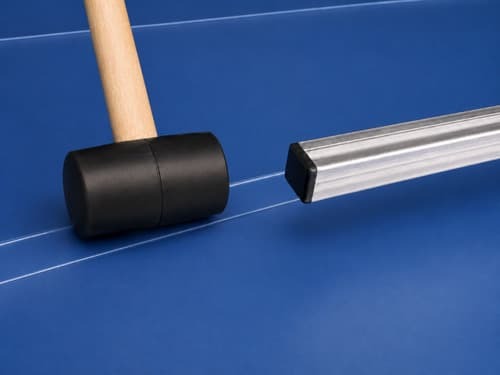
Installing plastic end cap into SnoBar
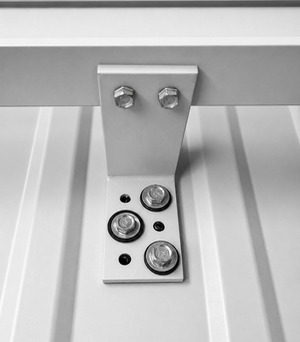
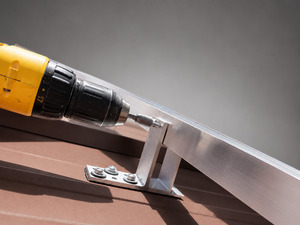
Step 5: Attach the Bar to the ColorBrackets
The SnoBar or ColorBar should never extend more than 3 inches past the last ColorBracket at either end of a continuous row. Starting at the farthest left ColorBracket, make sure the bar is seated tightly while applying downward pressure.
Install two screws through the back of each ColorBracket into the bar using a 3/8-inch driver bit. Continue this same process for each ColorBracket while maintaining downward pressure on the bar.
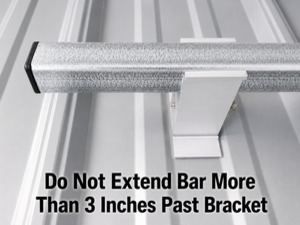
Bar should not extend more than 3 inches past bracket
Screw bar to ColorBracket through back of bracket
Repeat Steps 1 through 5 for each full section of bar until the row is complete.
Step 6: Join SnoBar or ColorBar Sections
For SnoBar
SnoBar butt joints should always be centered in the panel valley with no more than a 2-inch gap between butted ends. Some panels require the bars to be cut to obtain correct seam spacing.
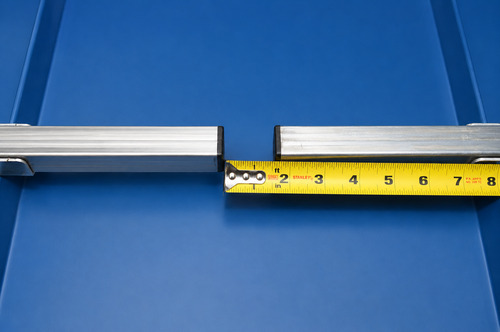
SnoBar butt joint centered in panel valley with maximum 2-inch gap
For ColorBar
ColorBar splice connectors create a continuous run of bar. The bar ends should be spaced at least 1/8 inch apart to allow for expansion and contraction. ColorBar butt joint connections can be made anywhere along the row except inside Tall/Short ColorBrackets, as long as the splice connectors are properly installed with one screw each.
Two-inch color strips can be made from excess metal panels on the jobsite. User-supplied color strips can be installed on the face of the ColorBar and in the front slot of the Tall/Short ColorBracket.
ColorBar splice connector installed with one screw
Slide ColorStrip into the ColorBar channel
ColorStrip installed in ColorBracket. Make sure to pinch one of the ends of the channel so the ColorStrip does not slide out.
Crimp the ColorBar and ColorBracket ends so the ColorStrip does not slide out.
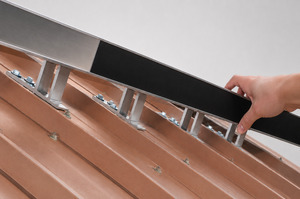
Step 7: Space Additional Rows
Space additional rows of SnoBar or ColorBar evenly up the slope, always measuring from the eave according to the layout provided. Proper row spacing helps reduce snow and ice slides while distributing structural loading across the roof.
Example: If the panel length from eave to ridge is 31 feet 6 inches and three rows are required, place the first row 18 inches up from the eave, the second row 11 feet 6 inches from the eave, and the third row 21 feet 6 inches up from the eave.
If you are unsure how to space additional rows, call 800-766-5291.
Design Considerations
- New and existing structures must be evaluated to make sure they can withstand retained snow loads.
- When there is an overhang at the eave, confirm the overhang can support the accumulated snow load. Otherwise, the first row should be installed at the bearing wall.
- Do not place the SnoBar or ColorBar system only in isolated areas such as over doorways, vents, or partial roof sections without special design consideration.
- No snow retention system can retain 100% of snow and ice from falling off a roof. The system is designed to help reduce the danger of sliding snow and ice.
- The designer, architect, installer, or owner should understand local snow loads, climate conditions, roof slope, roof orientation, drifting potential, and roof design before installation.
- System layout is calculated using panel length, ground snow load, roof slope, snow loading, and areas needing protection from falling snow. More than one row may be needed.
- Extreme weather, drifting, ice, and unusual snowfall may require snow and ice to be physically removed from the roof.
Important Responsibility Notice
Action Manufacturing LLC and/or IceBlox, Inc. are not responsible for failure caused by improper installation, improper panel attachment, improper roof system installation, or inadequate layout of the SnoBar or ColorBar system. It is the responsibility of the designer, architect, installer, or owner to assess the suitability of using SnoBar or ColorBar systems for the project.
SnoBar and ColorBar Screw-Down Installation Summary
Single-bar SnoBar and ColorBar screw-down installation uses ColorBrackets fastened directly into structural supports on mechanically fastened metal roof panels. The brackets hold one row of SnoBar or ColorBar to help reduce sudden snow and ice movement on exposed-fastener ribbed panels and 2.67 corrugated metal roofing.
The system should be installed with proper row placement, verified screw engagement, correct bracket spacing, and project-specific consideration for roof slope, panel length, snow load, and structural support locations.
Need Help With Layout or Installation?
SnoBlox-Snojax provides design assistance for SnoBar and ColorBar snow retention layouts. For help with screw-down ColorBracket spacing, layout, or installation questions, call 800-766-5291 or email support@snojax.com.
Single-Bar SnoBar & ColorBar Screw-Down Installation FAQ
These instructions cover the single-bar Screw-Down SnoBar, Screw-Down ColorBar, SnoBar for 2.67 corrugated metal roofs, and Screw-Down ColorBar for 2.67 corrugated metal roofs.
A ColorBracket is a screw-mounted bracket used to hold SnoBar or ColorBar on mechanically fastened metal roofing panels. Use the Tall and Short ColorBrackets on R-panel style roofs. Install 2.67 ColorBrackets on wavy 2.67 corrugated panels.
Install the first row approximately 12" to 18" up from the eave. If the roof has an overhang, place the first row over the load-bearing wall.
The tall ColorBracket is the most popular size. The short ColorBracket is available by request as a lower-profile option. The metal roof panel profile must accommodate a low-profile bracket.
Tall and Short ColorBrackets fasten with three screws in an S-pattern. The bracket holes should face upslope, and fully embed the screws into a structural support below.
2.67 ColorBrackets are fastened with four screws through the outside holes in a square pattern. The screws are mounted on top of the ribs and must fully engage the structural support below.
SnoBar or ColorBar should never extend more than 3" past the last ColorBracket at the end of a row or where a row terminates in a valley.
SnoBar sections use butt joints instead of splice connectors. Center each butt joint in the panel valley, and keep the gap between butted SnoBar ends no more than 2".
Join ColorBar sections with splice connectors. The ColorBar ends should be spaced at least 1/8" apart to allow for expansion and contraction, with each splice connector secured with one screw.
Additional rows should be spaced evenly up the slope according to the suggested spacing layout or a project-specific layout. Always place rows over purlins or structural supports.