SnoBar, ColorBar & WindBar Stainless Clamp Installation Instructions
SnoBar, ColorBar & WindBar Installation Instructions for Standing Seam Metal Roofs
Follow these SnoBar, ColorBar and WindBar installation instructions for standing seam metal roofs to install a continuous metal roof snow rail system using stainless steel seam-mounted clamps, 90 inch-pound set screw torque, proper row spacing, and approved snow retention layout practices.
Quick Answer: How Do You Install SnoBar, ColorBar or WindBar on Standing Seam Roofs?
Standing seam SnoBar, ColorBar and WindBar with stainless steel seam clamps are installed on compatible standing seam metal roofs by securing each clamp to the panel seam, torquing the set screws to 90 inch-pounds, seating the rail into the clamps, and fastening the bar to each clamp with tek screws.
The first row is typically placed 12" to 18" above the eave, or over the load-bearing wall when the roof has an overhang. Additional rows depend on roof slope, roof length, seam spacing, snow load, and project layout.
Standing Seam Clamp Version Covered by These Instructions
These instructions cover SnoBar, ColorBar and WindBar installations using the stainless steel standing seam clamp. WindBar uses the same stainless steel standing seam clamp attachment method, but it is designed for wind noise suppression rather than snow retention. Aluminum RoofClamp installations that use an RCB-3 bracket to attach the bar to the clamp require SnoBar & ColorBar installation instructions for aluminum RoofClamp.
Important Safety Notice
Read and fully understand all warnings, instructions, layout requirements, and design considerations before installing a SnoBar, ColorBar or WindBar standing seam system.
Never use the SnoBar, ColorBar or WindBar system as a tie-off point. All workers must follow OSHA fall protection requirements and be properly harnessed and anchored when working on a roof.
SnoBar and ColorBar snow rail systems are designed to help reduce the sudden release of snow and ice from metal roofs, while WindBar uses the same standing seam clamp attachment method for wind noise suppression. Correct installation depends on roof panel attachment, clamp placement, set screw torque, bar layout, and the number of rows required for the roof conditions.
Before Installing SnoBar, ColorBar or WindBar
Before starting installation, confirm that the standing seam roof panels are properly attached to the structure at a fixed point and that the roof can handle the added load from retained snow.
Standing seam roof clips usually do not provide a fixed point for floating roof panels. If the panel attachment, snow load, or structural capacity is uncertain, consult a professional metal roofing installer, designer, architect, or engineer before proceeding.
Required Tools for SnoBar, ColorBar and WindBar Installation
- Rubber mallet for SnoBar end caps
- Drill gun with 3/8" nut driver bit for tek screws
- Torque wrench that reads inch-pounds
- 3/16" Allen bit for set screws
- Flex pivot bit for shorter seams
- Tape measure
- Hacksaw
- Deburring file
- Pencil
System Parts
- SnoBar clamps with cup-tipped set screws
- SnoBar, ColorBar or WindBar rail sections
- Self-drilling tek screws
- End caps for SnoBar installations
- Splice connectors for ColorBar installations
- Optional IceStoppers, if ordered for the project
Determine the Row Layout
Verify that the roof panel is compatible with the stainless steel standing seam clamp using the standing seam panel compatibility guide. Layouts are not always provided with the order, so review the standing seam snow retention layout guidance before installation. As a basic starting point, the first row is typically placed 12" to 18" up from the eave, or over the load-bearing wall when an overhang is present.
Additional rows should be spaced evenly up the roof slope according to roof length, snow load, slope, roof orientation, and the areas needing protection below the roof edge.
SnoBar, ColorBar and WindBar Installation Steps
1. Prepare the Stainless Steel Standing Seam Clamps
Insert two set screws into each SnoBar clamp before getting on the roof. The cupped tips should point inward toward the panel seam. Leave enough clearance for the clamp to slide over the standing seam.
2. Mark the First Bar Section
Based on the project layout, measure 12" to 18" up the seam from the eave. If the roof has an overhang, place the first row over the load-bearing wall. Mark the first seam, then mark the seam near the opposite end of the bar section.
Do not place clamps over clips whenever possible, because this can restrict thermal movement of the roof panels.
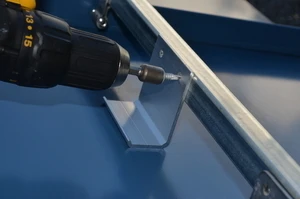
3. Install the First Two Clamps
Set the first SnoBar clamp on the far-left seam at the pencil mark. Hand-tighten the set screws while keeping the clamp centered and fully seated on the seam. The holes in the bar receiver section should face upslope.
Apply downward pressure to the clamp and torque both set screws to 90 inch-pounds. Repeat this process on the far-right seam for the same bar section.
First SnoBar clamp installed on seam, centered and facing upslope
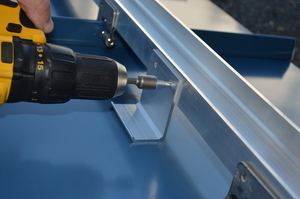
4. Use the Bar as a Straightedge
Place a full section of bar into the installed clamps without attaching it yet. Use this bar as a straightedge to position the remaining clamps for that section. Hand-tighten the remaining clamps first, then torque all set screws to 90 inch-pounds while applying downward pressure.
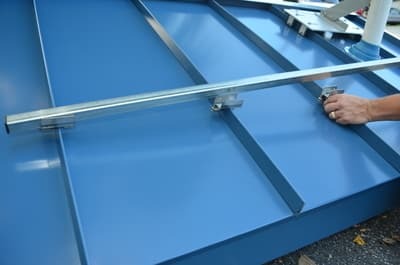
Bar resting in two clamps to line up the remaining clamps
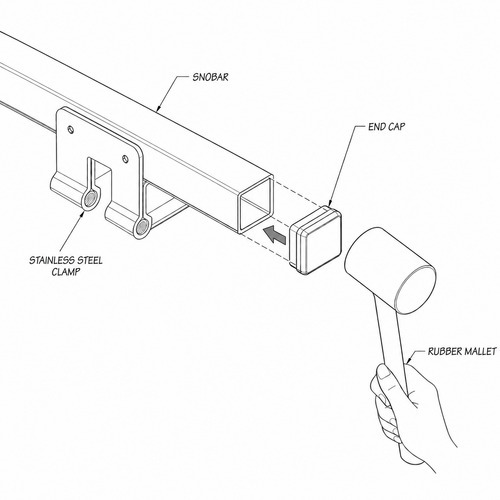
5. Install End Caps for SnoBar
If installing 1" square SnoBar, install the supplied plastic end caps at each end of the bar. Deburr any field-cut bars before installing end caps. If installing aluminum ColorBar, skip this step.
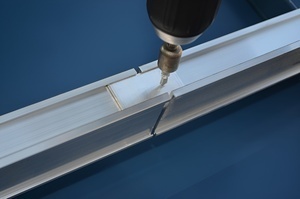
6. Attach the Bar to the Clamps
Seat the SnoBar, ColorBar or WindBar tightly into the clamps. Starting at the far-left clamp, apply downward pressure and install two tek screws through the back of each clamp into the bar using a 3/8" driver bit.
The bar should never extend more than 3" past the last clamp at either end of a continuous row.

tek screws being driven through the back of the clamp into the bar
7. Install Optional IceStoppers (SnoBar & ColorBar) or Required WindStoppers (WindBar)
If IceStoppers are included, position the short leg of the IceStopper facing upslope. Align the IceStopper with the upslope side of the bar, hold it tightly against the bar, and install two tek screws while applying downward pressure. IceStoppers may not have pre-drilled holes; if needed, mark and pre-drill the IceStopper before fastening it to the bar. The IceStoppers are referred to as WindStoppers when installing this system as WindBar. WindStoppers are required with WindBar.
For one IceStopper per panel, center it between clamps. On panels 18" or wider, use two or three IceStoppers spaced evenly between panel seams.
Installing IceStopper/WindStopper to SnoBar
Installing IceStopper/WindStopper to ColorBar
8. Join SnoBar or ColorBar Sections
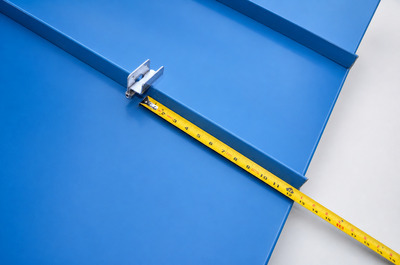
For SnoBar, butt joints should be centered in the panel valley with no more than a 2" gap between butted ends. Some panels require field cutting to maintain correct seam spacing.
For ColorBar, supplied splice connectors create a continuous run of bar. Bar ends should be no more than 1/8" apart. ColorBar butt joints can be made anywhere along the row except inside a clamp, provided splice connectors are installed correctly with one tek screw each.
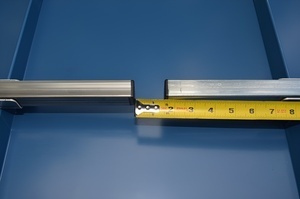
Tape measure shows proper SnoBar butt joint gap.
Splice connector is installed with one tek screw.
9. Install Additional Rows
Space additional rows evenly up the slope according to the supplied layout. Measuring from the eave helps provide balanced loading across the roof structure and better protection against snow and ice slides.

Roof panel example showing multiple rows spaced up the slope.
Critical Installation Rules
- Do not extend the bar more than 3" beyond the last clamp.
- Short sections of SnoBar, ColorBar or WindBar must span at least two seams.
- A short bar clamped to a single seam is not acceptable and may fail.
- Clamp spacing depends on seam spacing, generally from 12" on center to 42" on center.
- Clamps should normally be installed on every seam to distribute the load evenly.
- Set screws must be torqued to 90 inch-pounds.
Design Considerations for Metal Roof Snow Rails and Roof Noise Suppression
All loads created by the SnoBar, ColorBar or WindBar system transfer into the roof panels. Proper panel attachment to the substrate or structure is necessary to help prevent roof panels from sliding under retained snow load or shifting under system loads. WindBar uses the same stainless steel standing seam clamp attachment method, but it is used for roof noise suppression rather than snow retention.
New and existing structures must be evaluated to confirm they can withstand retained snow loads. This is especially important when the roof has an eave overhang, drifting conditions, high ground snow load, or areas where falling snow could create a hazard.
SnoBar, ColorBar or WindBar systems are not recommended for isolated placement only above doorways, vents, or partial roof areas without special design review. Snow retention should be evaluated as a roof-wide system, not just a small localized barrier.
Roof and Seam Requirements
Roof systems should generally be a minimum of 24-gauge steel with a seam height of at least 1". Do not use the SnoBar, ColorBar or WindBar system on seams with separate seam covers or batten strips.
Snow Retention Performance Notice
No snow retention system can retain 100% of snow and ice under every condition. SnoBar and ColorBar systems are designed to mitigate the dangers of sliding snow and ice, but extreme snowfall, ice buildup, drifting, and unusual weather conditions may require physical snow and ice removal from the roof.
Need Help With Layout?
SnoBlox-Snojax provides design assistance for SnoBar and ColorBar snow retention layouts and WindBar roof noise suppression layouts. Roof length, ground snow load, roof slope, panel type, seam spacing, and protected areas all affect the number of rows and placement.
For installation or layout questions, call 800-766-5291 or email support@snojax.com.
SnoBar, ColorBar & WindBar Standing Seam Installation FAQ
SnoBar or ColorBar is typically installed 12" to 18" up from the eave, or over the load-bearing wall when the roof overhangs. Always follow the project-specific layout when provided. WindBar first row placement is 12-18 up from the bottom as well and rows are typically placed five feet apart as they progress up the roof slope.
The SnoBar stainless-steel clamp set screws should be torqued to 90 inch-pounds while applying downward pressure to keep the clamp seated properly on the standing seam.
No. Short sections of SnoBar, ColorBar or WindBar must span at least two seams. A short bar clamped to a single seam is not acceptable and may fail.
SnoBar, ColorBar or WindBar should never extend more than 3" past the last clamp at the end of a row or where a row terminates in a valley.
IceStoppers are optional accessories used to help reduce snow and ice from sliding under the bar. If snow or ice slides under the rail after installation, installers can add IceStoppers later. WindBar requires WindStoppers (a.k.a. IceStoppers) to hold the panel down to reduce metal roof noise.
Install ColorBar splice connectors anywhere along the row except inside a clamp. Bar ends should be no more than 1/8" apart. Secure each splice connector with one Tek screw to allow expansion and contraction.
SnoBar, ColorBar or WindBar systems are not recommended for isolated placement only above doorways, vents, or partial roof areas without special design review. Snow retention and roof noise suppression layouts should be evaluated as roof-wide systems, not just small localized barriers.
SnoBar, ColorBar and WindBar are compatible with most standing seam roof systems. The roof should generally be at least 24-gauge steel with a minimum 1" seam height, and it should not use separate seam covers or batten strips. Nail-Strip panels with tapered seams may not be compatible with standing seam clamps.