Ventsaver Installation Instructions
Installation guidance for VentSaver Mounting Plate Kits, VentSaver Extreme, VentSaver HD, and VentSaver EZ snow and ice diverter systems.
How to Install VentSaver Roof Vent Protection
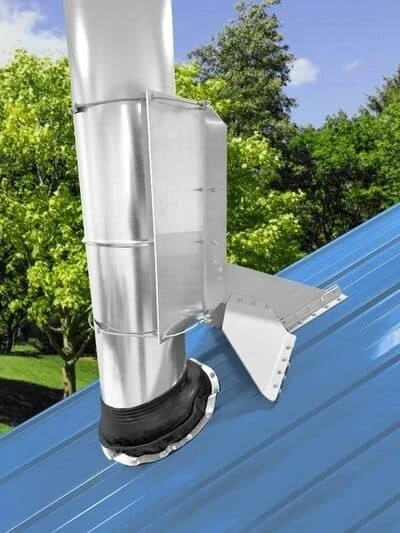
VentSaver installation instructions explain how to install SnoBlox-Snojax vent pipe snow protection systems on metal roofing. VentSaver products help protect roof vents, pipe boots, chimney pipes, and other rooftop penetrations from sliding snow and ice.
This guide covers VentSaver Mounting Plate Kits, VentSaver Extreme, VentSaver HD, and VentSaver EZ for standing seam and screw-down metal roof applications.
Which VentSaver Installation Method Should You Use?
Select the installation method based on the roof panel type, pipe location, snow load exposure, and available structural attachment points. Standing seam roofs typically use clamp-mounted plate kits, while exposed-fastener metal roofs require secure attachment into decking, blocking, or structural support below the panel.
What Should You Know Before Installing VentSaver?
Read all instructions fully before installation. Use proper safety goggles, gloves, and fall protection. Follow OSHA fall protection requirements and verify the roof structure can support the installation.
Important: Roof penetrations and mounting points should be sealed as required with silicone or roofing sealant. Never use a VentSaver plate as a roof anchor tie-off point.
VentSaver Product Installation Instructions On This Page
VentSaver Mounting Plate Kit Installation
Use this plate kit to mount VentSaver on most standing seam roof panels without panel penetration, or on some screw-down roof panels when optional accessories or mounting conditions make the plate desirable.
Required Tools
- Safety goggles, gloves, and fall protection
- Caulk gun
- Tape measure
- Pencil or Sharpie
- Ratcheting torque wrench capable of reading inch-pounds
- Cordless impact driver with socket adapter
- Socket wrench
- 9/16" socket for roof clamps
- 7/16" socket and 7/16" wrench
- 3/8" socket for Tek screws
- 5/16" socket for cable clamps
- Cordless drill
- 1/4" drill bit
- 1/8" drill bit
- Hacksaw or chop saw with metal blade
Choose the Correct Attachment Method
Standing Seam Roofs
Use the SS VentSaver Mounting Plate with included roof clamps. Verify clamp fit to the seam profile before ordering or installation.
Screw Down Roofs
Use the SD VentSaver Mounting Plate when pipe or chimney position makes direct mounting difficult, or when avoiding wing kit modification is preferred. Fasten into a solid substrate below the panel, not just the metal roofing.
Kit Contents
SS Plate Kit Includes
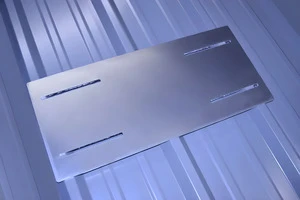
- 1/4" adjustable aluminum plate, 27" wide
- 1/8" aluminum ice ramp with edging strip
- (4) RCT universal-fit standing seam clamps
- (12) 1/4" x 1" Tek screws
- (12) clamp set screws
- (4) 9/16" hex top bolts with stainless washers
- 3/16" hex bit
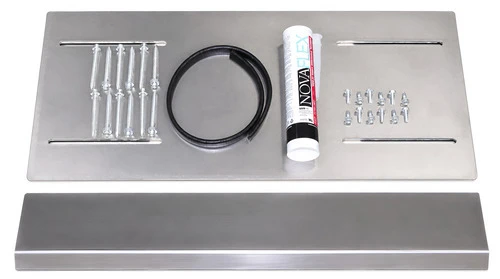
SD Plate Kit Includes
- 1/4" adjustable aluminum plate, 27" wide
- 1/8" aluminum ice ramp with edging strip
- (12) 3" 1/4-14 wood screws with neoprene washers
- Tube of NovaFlex all-weather silicone
- (12) 1/4" x 1" Tek screws

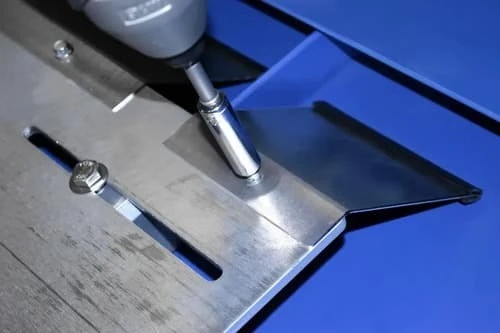
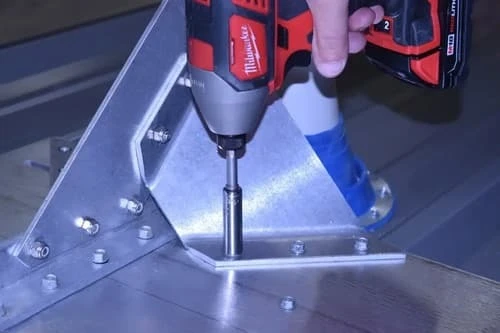
Standing Seam Plate Installation
- Determine which of the base bracket holes line up best for the application. Consider wing kit or height extender placement before attachment. Do not attach the base bracket to the plate yet.
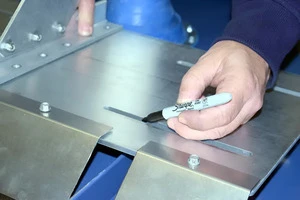
- Set the fin and base bracket assembly onto the aluminum plate with the six holes facing down. Position it in front of the pipe and slide the plate until the fin just touches the pipe. Mark the six base angle holes and the four clamp locations on the seams.
- Attach the four roof clamps onto the roof panel at the marked locations. Hand-tighten the clamp set screws. Loosely attach the plate using the top bolts and washers.
- Once exact clamp locations are confirmed, remove the plate and top bolts, then torque the clamp set screws to 90 inch-pounds.
- Do not attach the VentSaver base bracket until after installing the ice ramp.
Screw Down Plate Installation
- Set the plate on the high seams just upslope of the pipe or chimney. Adjust side to side so it sits on at least three seams.
- Mark the panel seams and mark twelve hole locations in the plate, spaced evenly with four holes per seam.
- Before drilling, mark where the VentSaver base bracket and optional wing kit will mount.
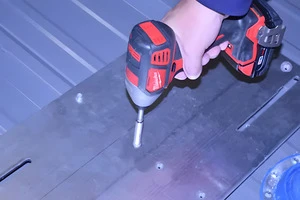
- Remove the plate and drill twelve 1/4" holes in the plate.
- Apply included silicone generously on the high seams between the marked lines.
- Set the plate into the silicone and screw it down.
- All screws must fasten into decking or structural support below. Never attach only to sheet metal.
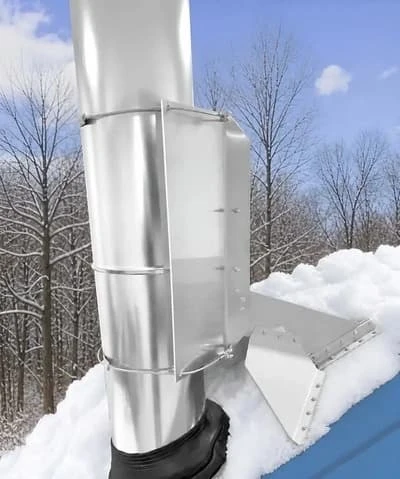
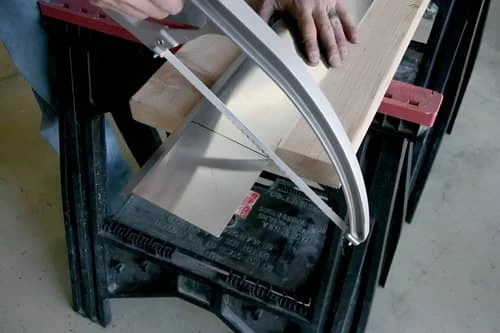
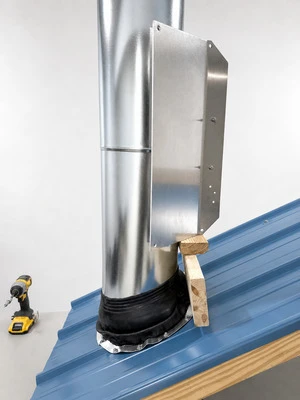
Ice Ramp Installation
This step is essential for both SD and SS plate installations. The ice ramp helps keep snow and ice from sliding under the aluminum plate and damaging the pipe base and/or boot.
- Custom cut the ramp into as many pieces as needed.
- Slide the rubber edging strip onto the custom-cut ramp pieces before fastening them.
- Attach the ramp to the plate before attaching the VentSaver mounting bracket to avoid notching issues.
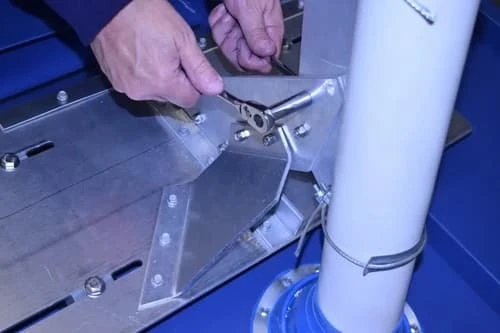
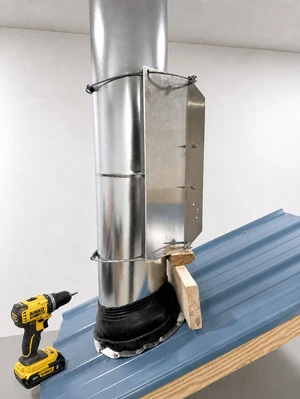
Attach VentSaver to the Plate
- Skip this step if installing the optional height extender C-Kit.
- Set the base bracket with assembled fin on the installed plate.
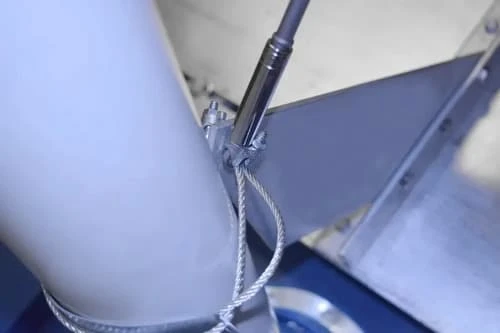
- Run the cable through the large hole at the top of the fin, around the pipe, and back through the hole.
- Install a cable lock on each side of the fin, locking both cables in each cable lock.
- Trim or tuck in excess cable.
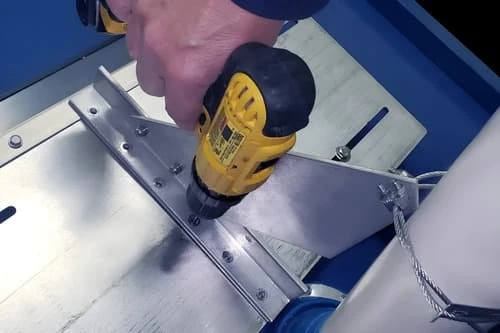
- Predrill one 1/8" starter hole through the middle bracket hole into the plate.
- Confirm bracket alignment, predrill the remaining five holes, and fasten with the remaining Tek screws.
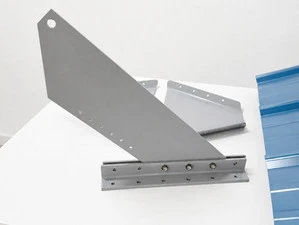
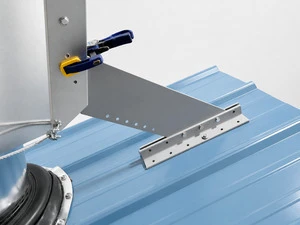
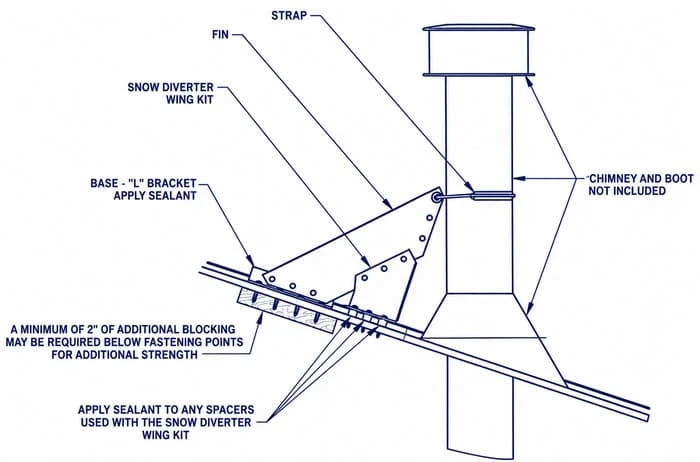
Optional Wing Kit Installation
- Fasten the wings to the fin with the two longer bolts and nylon lock nuts.
- Predrill six 1/8" starter holes in the plate.
- Install the six Tek screws.
Optional Height Extender C-Kit
- Remove cable if previously installed.
- Install upper and lower cable in the predrilled holes of the height extender.
- If needed, move the fin back one hole on the mounting bracket for wing kit clearance.
- Predrill 1/4" holes in the fin after confirming cable placement and final fit.
- Install nylon lock nuts and washers and tighten with a 7/16" socket and wrench.
VentSaver Extreme Installation
VentSaver Extreme uses a lower wing assembly and may also use an optional upper chimney wing kit. For best results, it is recommended to mount the system on a VentSaver SD or SS plate matched to the roof panel type.
Required Tools
- Safety goggles, gloves, and fall protection
- Caulk gun
- Tape measure
- Pencil or Sharpie
- Drill with 7/16" socket
- 7/16" wrench
- Squeeze clamp
- 8mm socket for roofing screw installation
- 1/4" drill bit
- 12" level
Mounting Hardware
- 20 roofing screws
- 11 one-inch bolts with lock nuts
- 4 cable locks
- 2 cables
- 6 to 8 spacers
Important installation note: Seal all roof penetrations with silicone or roofing sealant, including both mounting brackets and lower wing kit mounting screws and spacers.
Structural requirement: For maximum strength, roofing fasteners should embed into at least 2 inches of solid structural wood. Add blocking between rafters if needed.
Installed Dimensions on a 4/12 Pitch Roof
- Lower wingspan: 21.5"
- Upper wingspan: 12"
- Fin height: 14.5"
- Height with upper wing kit: 32"
Optional Upper Wing Kit
- Assemble the two upper wings together using two 1" bolts and lock nuts through the predrilled holes in the 3" flange.
- Place the assembly on a temporary wood block so the 3" flange points upslope and the V-shaped side straddles the pipe.
- Insert the cable spacer plate into the center of each cable.
- Feed the upper and lower cables through the predrilled holes in the upper wing assembly.
- From the upslope side of the pipe, wrap the cables and secure them with cable locks on each side of the 3" flange.
Main Assembly and Roof Attachment
- Assemble the riser fin to the two mounting bases using three 1" bolts with lock nuts. Mount the fin centered to the pipe as closely as the panel profile allows while keeping it on a smooth flat surface.
- Place the assembled fin/base upslope of the pipe so the fin overlaps the 3" flange of the upper wing kit.
- Adjust the upper wing assembly up or down based on roof pitch so the top of the fin overlaps the bottom of the upper wing flange and allows room for three bolts.
- Temporarily clamp the assembly in place.
- Use twelve 2" heavy-duty roofing screws to secure both mounting bases to the roof, fully embedded into structural wood.
- If the optional upper wing kit is used, confirm it is plumb. Mark and drill through all three aluminum layers using a 1/4" bit, then secure with three 1" bolts and lock nuts.
- If no upper wing kit is used, wrap the cable around the pipe and secure it with cable locks.
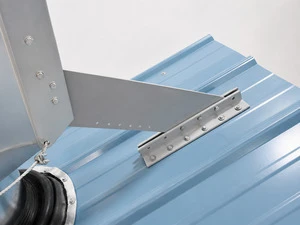
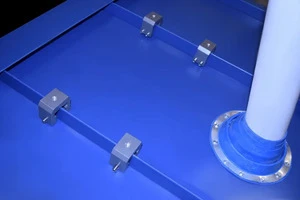
Lower Wing Kit Installation
- The lower wing kit includes right and left plates. The flanges with three holes mount against the fin; the flanges with four holes go down across the panel or high rib.
- Position the lower wings so the downslope side stays close to the pipe boot to reduce snow and ice buildup.
- If factory holes do not align, drill new holes for a custom fit.
- Use the center factory hole in one wing to drill through the riser fin with a 1/4" bit.
- Insert a 1" bolt through one wing, the fin, and the opposite wing, then secure with a lock nut.
- Repeat for the other two lower wing mounting bolts.
- Each lower wing flange needs four fasteners. Where a flange crosses a high rib, predrill a 1/4" hole so the roofing screw penetrates the center of the rib.
- Fasten remaining holes with screws and spacers filled with silicone or roofing sealant.
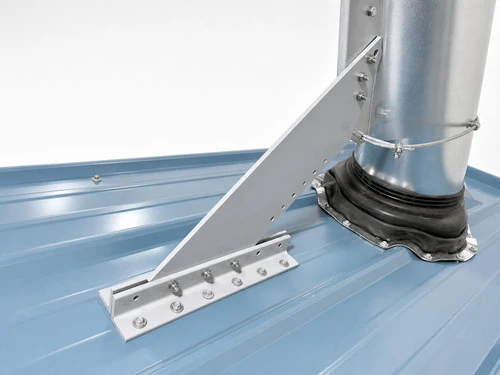
VentSaver HD Installation
VentSaver HD is mounted in five basic steps and may use a snow diverter wing kit with spacers where needed to span minor rib profiles.
Recommended Tools
- Impact gun with 5/16" driver
- Cable cutter
- Two 7/16" wrenches
- Caulk gun
Installation Steps
- Attach fin to base angle: Assemble using three 1/4" x 3/4" stainless steel bolts. If rib obstruction exists, the base angle may be reversed.
- Install base: Apply sealant to the bottom of the base angle. Place the base over the chimney or vent with VentSaver centered behind and close to the pipe. Fasten the base to the roof using six lag screws.
- Install strap: Pull one cable end through pliers until snug. Keep the shoulder strap on the opposite side of the pipe from the VentSaver. Tighten nut and bolt firmly, then trim excess cable.
- Install diverter wing kit: Use the provided spacers where needed to compensate for minor rib height and allow the wing kit to span those rib profiles.
- Double-check all fasteners for tightness.
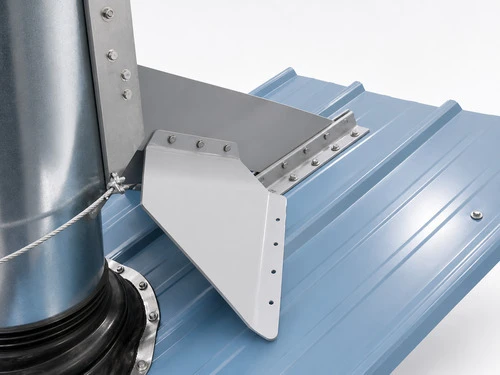
VentSaver EZ Installation
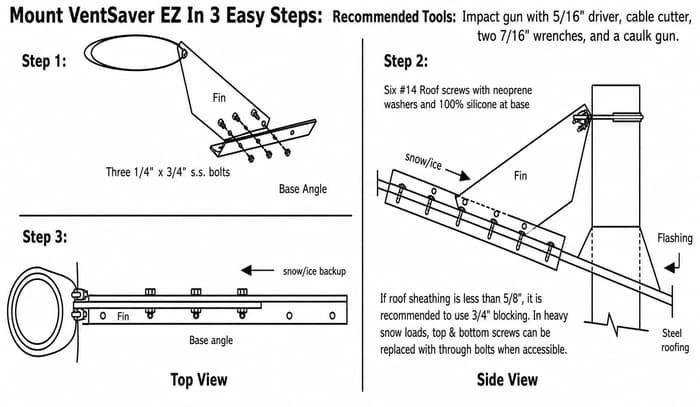
VentSaver EZ is a simplified three-step installation method for vent protection on metal roofing.
Recommended Tools
- Impact gun with 5/16" driver
- Cable cutter
- Two 7/16" wrenches
- Caulk gun
Installation Steps
- Attach fin to base angle: Assemble with three 1/4" x 3/4" stainless steel bolts. If rib obstruction exists, the base angle is reversible.
- Install base: Put sealant on the bottom of the base angle. Fasten the roof with six #14 roof screws with neoprene washers and 100% silicone at the base. For maximum strength, use longer screws to fasten into solid wood when needed. If roof sheathing is less than 5/8", use 3/4" blocking. In heavy snow conditions, the top and bottom screws may be replaced with through bolts when accessible.
- Install strap and tension: Thread the cable around the pipe or vent and across both sides of the base fin. Pull tightly on both cable ends to create a snug hold before tightening the bolts on the provided U-clamps on each side of the fin. Cut off excess cable. For PVC vent pipes, use a cut-off 2" to 3" piece of old VentSaver, a note card, or similar material under the cable to reduce direct pressure on the pipe.
Optional: Check the completed VentSaver for tightness after installation and verify all fasteners and cable hardware are secure.
Installation Reminders
- Verify clamp fit, panel profile, and structural attachment points before starting.
- Seal all required penetrations and spacer locations.
- Fasten into structural wood or approved substrate, not unsupported sheet metal.
- Keep the diverter assembly close to the pipe or boot to reduce snow and ice buildup below the unit.
- Recheck all bolts, screws, cable locks, and brackets after installation.
VentSaver Installation FAQ
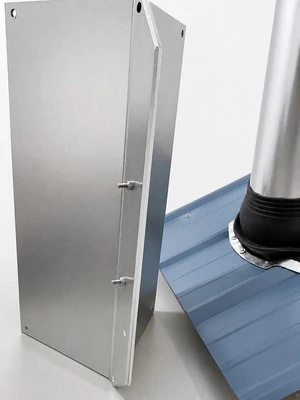
VentSaver helps protect roof vents, pipe boots, chimney pipes, and masts from sliding snow and ice on metal roofs. The system is installed above the vent pipe, chimney pipe, or mast to redirect snow and ice around it.
VentSaver can be installed on many standing-seam metal roofs when used with the SS VentSaver Mounting Plate Kit and compatible standing-seam clamps. Always verify clamp fitment with the roof seam profile before installation.
VentSaver can be installed on screw-down metal roofs using the proper screw-down mounting method or SD VentSaver Mounting Plate Kit. Fasteners must attach to solid decking, blocking, or approved structural support below the panel.
VentSaver installations that penetrate the roof require proper sealant. Use silicone or approved roofing sealant at roof penetrations, mounting screws, spacers, and other required sealing points.
VentSaver is not a roof anchor and must never be a fall protection tie-off point. Use approved fall protection equipment and follow OSHA safety requirements during installation.